
Franco Murua, April 22, 2019
It's a well documented fact that adding QA to any delivery system can considerably increase product value. However, what about automated QA? Does the use of automation really justify the perceived risks in both long and short term projects?
There are several advantages of adding automated QA including: early detection of bugs, full coverage of regression tests, data driven testing, and code consistency between branches.
Popular belief would have you think automated QA is only used for longer term projects. However, with small/short-term projects, automated QA testing can be just as effective. For instance, modern automatization technologies can help in building an entire continuous integration server with automated QA tools, like Selenium, in just a few commands.
In this post we will show you how to fully integrate Selenium with our CI process to trigger a set of test cases on a variety of browsers whenever a piece of code is pushed into the repository. Since we're talking about automatization, this post will also show a docker file to build everything from scratch given an empty debian docker image.
What is Selenium?
Selenium is simply a tool to automate everything that can happen in a web browser. We can use Selenium to test new or existing features, as well as test templates, pages, content, components and services. It can run on developer laptops or within the CI server on headless or normal mode with the help of Xvfb, an X11 server that executes all graphic operations in memory.
Advantages of using Selenium in a CI build system:
- Easy to use.
- Fast feedback for developers.
- Javascript integration.
- Regression and functional testing as many times as we want.
- Testing in a variety of browsers; Chrome, IE, Firefox, Safari, Opera and others. Using different versions as well through Selenium Grid.
- Unlimited test case executions.
Disadvantages of using selenium in CI build system:
Despite the fact that test cases can be easily and quickly recorded with the Selenium IDE tool, it’s better to drive the tests by writing them. If the nature of the frontend is highly volatile and changes frequently, it could be time consuming to accommodate all test cases. It may be advisable to wait until the UI is mature or simply consider that it is not the right framework for this project.
How much effort is needed to configure Selenium in a CI server?
The whole point of configuring Selenium within a CI tool is that we can run several instances of browsers in a non graphical interface. It is quite common to have our CI tool running in Linux, but if you’re in Windows (with MacOS X11 support was removed on Mountain Lion in favor of XQuartz) don’t worry about installing/configuring X11/Xvfb. We need to enable the Xvfb plugin within the test job to initialize the virtual frame buffer server so browsers can run in a simulated X server. Finally we need to configure code to either initialize the browsers directly or the Selenium Grid plugin. To use the grid we must configure Selenium hub with desired configurations and nodes to run the browsers.
Ingredients
- JDK > 1.8
- Jenkins
- Xvfb
- Browser
- Browser driver
Configure and Start Using
All ingredients, configurations and build are already prepared on this Dockerfile at this repo https://bitbucket.org/fdmurua/selenium-demo/src/master/. You simply need to clone it and run the docker image build command. It can take several minutes to prepare the image, but once complete the resulting image will be available to run.
*NOTE* The Adobe AEM instance is not provided within this demo, you must provide your own quickstar.jar and licence.properties files in order to copy over the docker image. Both files should be placed within the selenium-demo folder. If you don’t provide these files, the docker image build process will fail with a message like this:
Step 62/81 : COPY aem-publish-4503.jar ${AEM_HOME}/crx-quickstart.jar
COPY failed: stat /var/lib/docker/tmp/docker-builder919819688/aem-publish-4503.jar: no such file or directory
After git clone is complete:
cd selenium-demoTo build the image go into the cloned weretail folder and enter this command:
docker build .If everything goes well the output should be: Successfully built <anImageId> and then, to start a container with the built image, type:
docker run -p 8080:8080 -p 4503:4503 -p 80:80 -it <anImageId> /bin/bash*NOTE* Having an AEM publisher instance, with Apache and Jenkins, could be a little heavy for a docker container configured by default. To increase the memory go to Whale Docker Icon -> Preferences -> Advanced. Here you can increase the memory and the swap area.
Once the container is up and running you can start the three configured services and have this demo running;
service aemPublish startservice apache2 startservice jenkins start*NOTE* Some links are pointing to the default that jenkins runs within the Docker container, which is http://localhost:8080/jenkins. Please note this, as your hosting OS, may change the URL.
It will take some time, at least five minutes, to unpack publish jar, install all bundles and have AEM, Apache and Jenkins up and running. The next step is to start looking at Jenkins configuration, plugins and jobs. The docker image has Jenkins installed and some configuration files for plugins and jobs that were copied over the image. One more time, all these files are versioned in the repo.
X11 Server and Xvfb plugin
Xvfb is a X11 server which executes graphic operations in memory without showing anything on a screen. From a client standpoint, Xvfb is just like any other server serving requests and throwing back exceptions, with the difference being that nothing goes through a screen. Having Xvfb installed on a machine does not require a screen or display device, the only requirement is a network device. This X11 server is installed through Dockerfile at line 19.
The Xvfb plugin attaches a Xvfb session to the job execution life starting and stopping the session. In that session where Xvfb is running, the jobs have the ability to perform graphical operations in a non-graphical environment, such as this configured box. When we say graphical operations we are talking about allowing tests instantiating WebDriver objects which in turn will open browser binaries.
It only needs to know where the Xvfb executable is and if you want a screen resolution along with other parameters. It will only run at job execution time.
Xvfb and Xvfb plugins are already configured on the Docker image. As you can see on the "Global Tool Configuration” page, under the "Xvfb installation" section, there is no special deal on this item; the configuration is named as “default” and there is no directory to Xvfb because the binary is already in the $PATH.
Allow Selenium Drivers to Connect with Installed Browsers
This article covers two ways to connect to browsers and run browsers through the code - directly using concrete web drivers or indirectly using remote web drivers. The difference between these two methods is the abstraction level we desire. By using concrete web drivers, for example, developers should know where the browser binaries are. However, when using remote web drivers developers do not have to worry about that because the grid will know exactly where the binaries are and which version each browser has. It can also handle several instances of browsers. For example, the grid can have more than one instance per browser running in parallel. As you can imagine this last method is preferred for a large test suite. By using a concrete driver class or remote web driver, we will obtain a WebDriver instance which can be used to start our testing.
Accessing Browsers Directly From Their Binaries
This is the method used on the source code shown in this article. For simplicity we'll show you how to open the browsers using the concrete implementation of <Browser>Driver. There is no special configuration on this, we only need to know two things: (1) The browser binary path and (2) The location of the browser drivers. The first one is easy, all browser binaries are located in a place which is usually added to the $PATH. The second one is also easy, the docker script will place the drivers in the /data/apps folder. Finally we can obtain a browser instance from the code by calling it a new FirefoxDriver(options) or ChromeDriver(options).
Accessing Browsers Remotely Through RemoteWebDriver
To use this method we need to have the Jenkins Selenium plugin. This plugin turns our Jenkins server into a Selenium Grid server. That’s ok but what is that? A Selenium Grid server is a jar that benefits on the Jenkins distributed architecture. On the master the plugin will run as a “hub” and on the slaves it will run as a “node.” The “hub” is responsible for receiving the browser requests from the code and traversing the nodes to find a suitable browser. The “node” is responsible for holding the one or more browser binaries and running the requested one. It is possible to have nodes running in a different computer than the master. For example, we can have the hub and a node holding Firefox & Chrome in the same Jenkins machine and have another remote computer running Edge on Windows. This is possible thanks to the hub's ability to manage remote requests and distribute them across nodes.
To summarize, a Selenium Grid Server consists of:
- A Hub role; capable of scale test executions by running them in a parallel fashion in the desired browser instances across nodes.
- A Node role; (that may run in another computer) capable of maintaining a set of browser configurations, instances, versions and browser types and registering them to the hub for further selection.
The simplest remote configuration consists of having the hub and node in the same host. By default, the hub is already running and listening for remote connections on port 4444. As you can see the hub will receive connections from client tests at http://localhost:4444/wd/hub. Here is also a configured and registered node that contains five instances of Firefox v60 and Chrome v67.
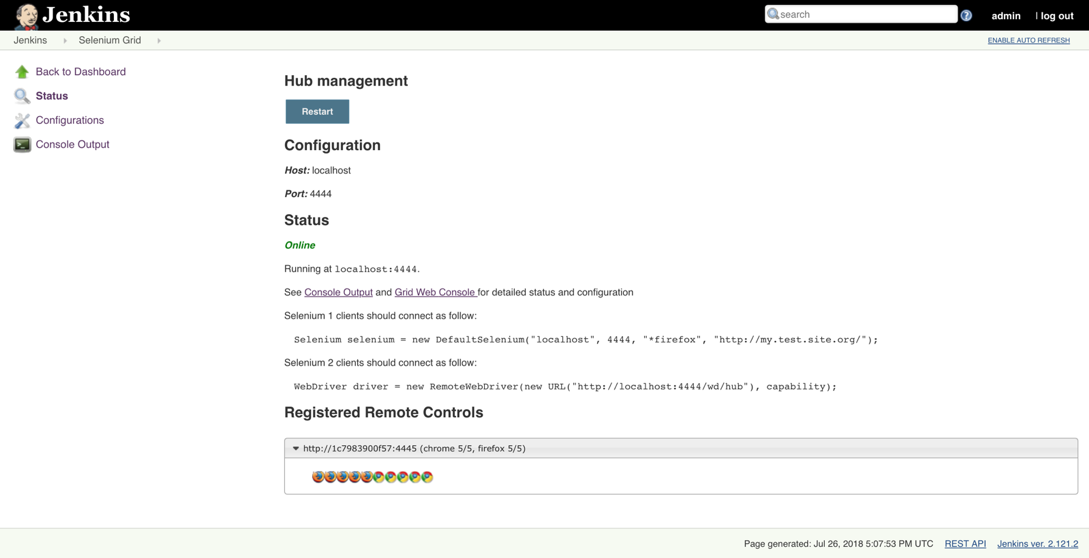
Hub configuration
The hub can be configured on the Configure System page and the most important items are the port (4444 by default) where the hub will listen for connections, the log level is useful for debugging and the hostname is useful if you need to use a value other than the localhost.
Node configuration
It can be configured in the Selenium grid config page. The node configuration should have an opened port where the hub will ping the node to know its status and ask what capabilities it has. A capability is a combination of OS, browser and version along with many other parameters. Basically with the first three arguments the hub will know which node to deliver the request to and which parameters to pass through the browser. For example, the test may request a Firefox v60 instance with javascript enabled or ssl certificates with turned off capabilities. On the given Docker image there is a node with 5 instances of Firefox 60 and Chrome 67 running on Linux platform. The node configuration is self explanatory; a port number, path for browser binary, path for the firefox/chrome driver and the version number. Finally, you can connect to whatever browser you want by specifying the capabilities through the DriverOptions object.
That’s about it when it comes to configuring Selenium Grid within Jenkins; now it’s time to go through the fun of running the code.
Go to http://localhost:8080/jenkins. The user to log in is the "admin" user and password is casually “admin”. Starting the AEM Publish instance can take several minutes. To verify it's running, navigate to http://localhost/content/we-retail/us/en.html. There you should see the WeRetail sample site from Adobe.

Now that the site is running, we can go ahead and explore the demo job; http://localhost:8080/job/SeleniumTestingDemo/configure
You will find the following configuration;
Build Triggers
The idea is to have Jenkins configured with the repository to trigger the launch on any code push. This can be achieved in two ways, either polling the repository from Jenkins or using a hook in the repo to tell Jenkins; "I have a change and you need to execute the job"
Both are widely used and have their pros and cons, there is no preferred mechanism over the other. Which one must we use? An excellent architect once told me; “There is no correct answer. The art lies on selecting the best path for the project at the time and being willing to change as needs change”.
For example, polling Git from Jenkins (given a scheduled expression) could be inefficient if the team is not constantly pushing because a high percentage of those polls would be in vain. It adds delays and unnecessary requests. However, on the other hand hooks can be problematic too. Hooks are configured and maintained per branch basis. An example would be the risk if a dev in project "A" kicked off a build in project "B". It would also depend on the commitment progression of the team; there is quite a distinct difference in having one team push minor changes within a small period of time and another team push code to reach a codebase state. The first one will trigger a lot of job executions without having considerable changes, the second will have more sense. Finally, all these pros/cons should be considered and weighed to get the most healthy and valuable CI.
Since we’re using a private container accessible through localhost, we cannot simply configure the webhook to a localhost so the trigger is disabled in this sample. However, you can find the plugins and guidelines for Github & Bitbucket.
Build Environment
An important item here is the Xvfb plugin. We need to enable it in order to start the virtual frame buffer where the browsers will run. Also, we've provided a screen resolution to avoid responsive Html to hide certain elements.
Finally, there is no other special configuration on this Job so we can proceed to execution. If everything is good, you should see a successful build and the Tests report without errors. Also, the code has requested the driver to take a screenshot, for both Firefox and Chrome, that you will find in the job workspace.
Code Summary
The most basic idea in this article is to have a single test class that can run on any browser, despite this articles purpose, the presented code/structure may not be suitable for your requirements (maybe the tests should behave differently on each browser) but again, is demonstrative. In order for the test class to run in different browsers we need to know the options and capabilities. Whether you use the concrete or remote driver, you'll need to pass distinct options, and to do that we use TestNG to parametrize the test suite.
For example:
<suite name="TestSuite" thread-count="1" parallel="tests">
  <test name="FirefoxTest">
    <parameter name="browser" value="Firefox"/>
    <classes>
      <class name="weretail.CrossBrowserScript"></class>
    </classes>
  </test>
  <test name="ChromeTest">
    <parameter name="browser" value="Chrome"/>
    <classes>
      <class name="weretail.CrossBrowserScript"></class>
    </classes>
  </test>
</suite>
We’re telling the TestNG framework to instantiate twice the weretail.CrossBrowserScript class and inject the node parameter in the setup. The purpose of that is to distinguish the driver and the options that the Test class needs to setup. However, regardless of that, the same piece of code marked with @Test will be executed in both Firefox and Chrome.
For example:
@BeforeTest
@Parameters("browser")
@BeforeClass(alwaysRun = true)
public void setup(String browser) throws Exception {

    if(browser.equalsIgnoreCase("firefox")){
        System.setProperty("webdriver.gecko.driver", "/data/apps/geckodriver");
        FirefoxOptions options = new FirefoxOptions();
        //...
        driver = new FirefoxDriver(options);
    } else if(browser.equalsIgnoreCase("chrome")){
        System.setProperty("webdriver.chrome.driver", "/data/apps/chromedriver");
        ChromeOptions options = new ChromeOptions();
        //...
        driver = new ChromeDriver(options);
    } else {
        //...

    }
    //...
}

@Test
public void commonTest() throws IOException {
    /**
     * The code in here is unique, so is equals for any browser
     */
}
How do We Hook this Up to the Build Process?
We simply add the TestNG dependency and plugin, and tell it where the test configuration is. Tests will be launched when the mvn test goal is invoked.
For example:
<build>
	<plugins>
		<plugin>
			<groupId>org.apache.maven.plugins</groupId>
			<artifactId>maven-surefire-plugin</artifactId>
			<version>2.22.0</version>
			<configuration>
				<suiteXmlFiles>
					<suiteXmlFile>src/test/resources/testng.xml</suiteXmlFile>
				</suiteXmlFiles>
			</configuration>
		</plugin>
	</plugins>
</build>
The Selenium web driver will open a page and will try to emulate what we want but we need to tell Selenium to perform actions on the proper elements. How does Selenium know that? We will provide the web elements (any node in the html document) for it and a further action to execute (like a click, if we selected a button/anchor - or - a text input command if we selected an input element).
For example:
driver.get(baseUrl);

driver.findElement(By.xpath("(.//*[normalize-space(text()) and normalize-space(.)='Women'])[3]/following::a[1]")).click();
driver.findElement(By.xpath("(.//*[normalize-space(text()) and normalize-space(.)='off'])[3]/following::a[1]")).click();
driver.findElement(By.xpath("(.//*[normalize-space(text()) and normalize-space(.)='XXL'])[1]/following::button[1]")).click();

driver.findElement(By.xpath("/html/body/div[2]/div[2]/div[2]/a")).click();
driver.findElement(By.xpath("/html/body/div[1]/div/div/div[2]/div/div[5]/a")).click();

driver.findElement(By.id("form-text-1460947019")).click();
driver.findElement(By.id("form-text-1460947019")).clear();
driver.findElement(By.id("form-text-1460947019")).sendKeys("franco");

driver.findElement(By.id("form-text-246733039")).clear();
driver.findElement(By.id("form-text-246733039")).sendKeys("murua");

driver.findElement(By.id("form-text-251335646")).clear();
driver.findElement(By.id("form-text-251335646")).sendKeys("general lopez 3681");

driver.findElement(By.id("form-text-489791559")).clear();
driver.findElement(By.id("form-text-489791559")).sendKeys("santa fe");

new Select(driver.findElement(By.id("form-options-1203914010"))).selectByVisibleText("Argentina");

driver.findElement(By.xpath("(.//*[normalize-space(text()) and normalize-space(.)='Gift & Promotional Codes'])[1]/preceding::div[5]")).click();

driver.findElement(By.id("form-text-68713227")).click();
driver.findElement(By.id("form-text-68713227")).clear();
driver.findElement(By.id("form-text-68713227")).sendKeys("4444333322221111");

driver.findElement(By.id("form-text-1651705086")).clear();
driver.findElement(By.id("form-text-1651705086")).sendKeys("01/23");

driver.findElement(By.id("form-text-935029260")).clear();
driver.findElement(By.id("form-text-935029260")).sendKeys("123");

driver.findElement(By.xpath("(.//*[normalize-space(text()) and normalize-space(.)='Gift & Promotional Codes'])[1]/following::button[1]")).click();
driver.findElement(By.xpath("(.//*[normalize-space(text()) and normalize-space(.)='Gift & Promotional Codes'])[1]/following::button[1]")).click();
assertEquals(driver.findElement(By.xpath("(.//*[normalize-space(text()) and normalize-space(.)='THANK YOU !'])[1]/following::h4[1]")).getText(), "Your order is being processed.");

takeScreenshot(1);
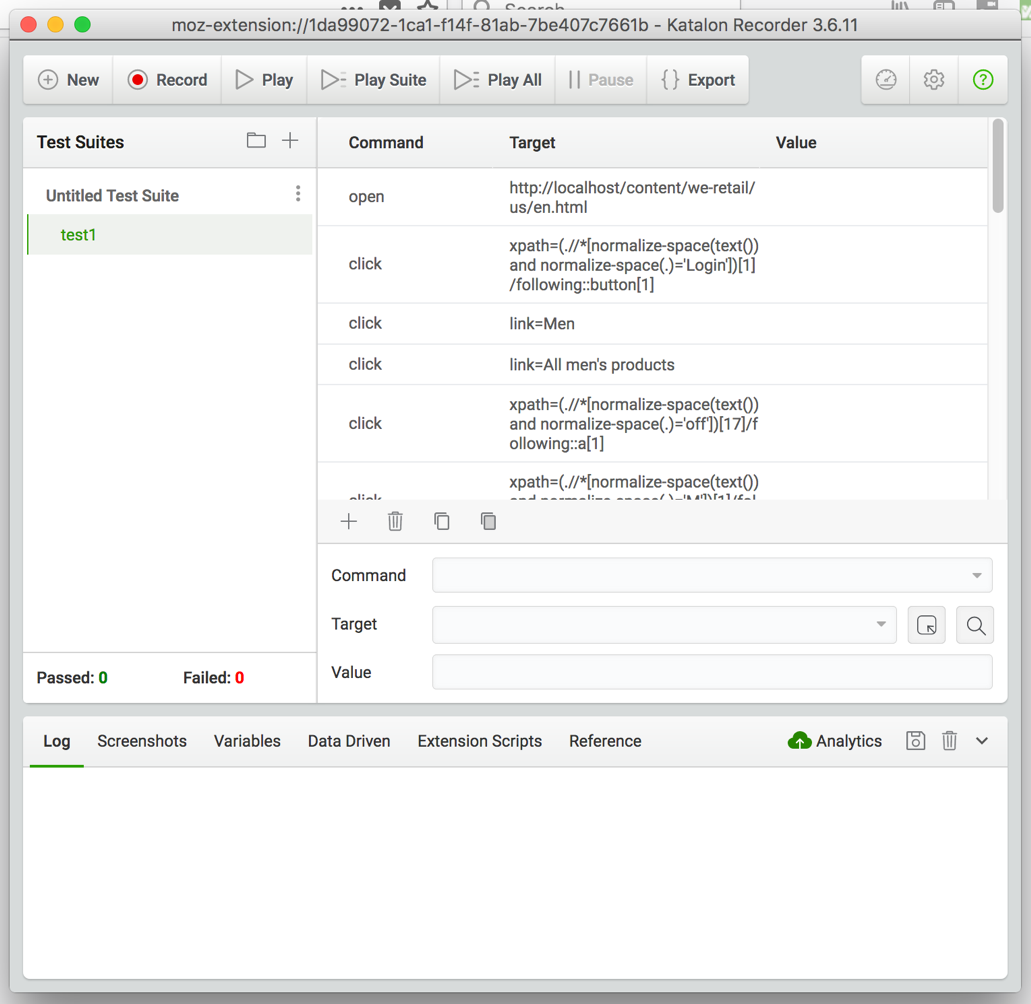
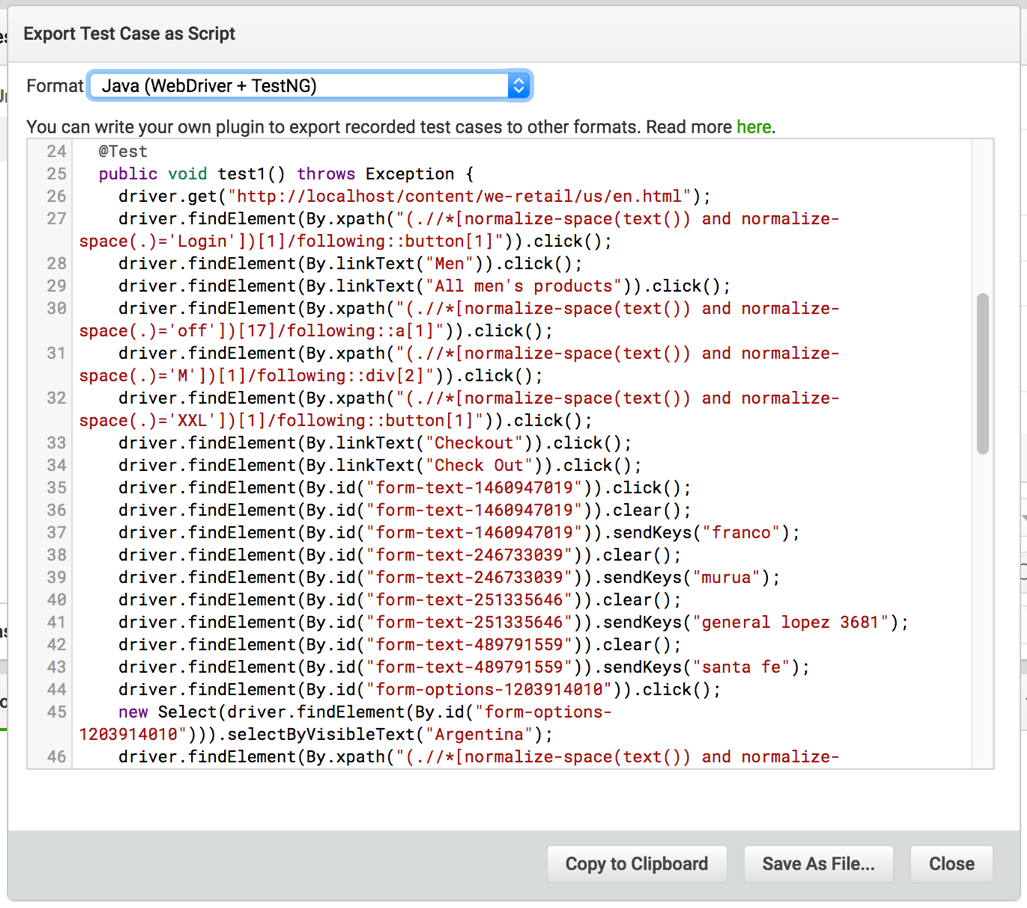
Did I write this unintelligible code? I did not. I recorded the test I wanted with a tool and simply exported the steps, which were pasted in my test class. In the first version, the Selenium IDE for Firefox was able to record and export the captured commands to a wide range of languages; however, the current version does not have that feature. The suggested tool to do this is Katalon. We won’t elaborate on this tool as it is fairly easy to use, but you can see below the commands we've captured and the option to export to Java + TestNG.
Conclusion
There is no perfect recipe to ensure your code will run be bug free, but we have tools to (at least) reach important coverage in our code. The value of adding automated QA is apparent, it can definitely transform the delivery process in the long run/big projects. Automated QA will also allow us to constantly add new test cases through iterations - keeping them in the loop on each release while testing only new features, in order to conduct easy and quick regression testing.
Automated QA may not be suitable if we're working on short term/small projects where the code evolves too quickly, time is limited for setup and/or test scripts creation. In this case, you may not have a choice if tasks like setting up the CI server, configuring Selenium, and writing tests are important time-sensitive considerations on your schedule. These tasks can be achieved in an easily with the mentioned tools and technologies like Docker, Ansible (not mentioned here but really useful to setup and configure Jenkins), Jenkins itself (and the new project Jenkins configurated as a code which allow us to automatically install plugins).
Ultimately, there is no single correct answer and you should weigh all approaches and tools to enhance your CI process when taking into consideration the organizational level and project timeline.
Need Help? We're Here For You!
At 3|SHARE, our entire focus is on Adobe technologies, and we’re the most knowledgeable partner in the industry as a result. In fact, 46% of our experts are AEM certified. AEM is a specialized solution requiring a unique skill set, and 3|SHARE’s experts are continuing to build on those skills every day.

Get in touch with us today to discuss a QA review and learn more about how our in-house experts can help you save time and money with a better approach to testing and automatic AEM testing.
Topics: Adobe Experience Manager, Quality Assurance, QA, AEM