Improving Front-End Development in Adobe Experience Manager
Ariel Benz, February 22, 2018
In this post Ariel Benz, AEM Frontend Developer at 3|SHARE, outlines the procedures for utilizing SASS with Gulp to reduce development time and increase organization of code and thus, ease of code management.
In recent months, we have completed several Adobe Experience Manager (AEM) SWIFT projects implementing the SASS with Gulp methodology. It has proven to be a very beneficial tactic for the development team, and is especially helpful for front-end developers. Previously, if we modified any file (HTML, CSS, Javascript) we had to compile the entire project to see the changes reflected. This was impractical and very time consuming. As a team, we defined a development process to speed up front-end development, while also providing a clearer project structure and improving ease of code maintenance.
During the development of a project there are many repetitive tasks that we must perform, such as compiling SASS files, moving files from one folder to another, minifying files, synchronizing the browser when the code is modified, validating the syntax, run unit tests, etc.
There are so many tools that enable automating this process. Through thorough analysis, we decided to use Gulp.
GULP is a tool that helps us to do all this by executing tasks that we define in a small javascript file, the famous gulpfile.js. Under the concept of task automation, we are going to take advantage of two powerful tools, SASS and ESLint.
SASS is a preprocessor that allows us to create stylesheets with a specific language which is then compiled into CSS directly. SASS enables us to reuse code. With a more scalable, modular code, we are able to reuse code within the project and in other projects. SASS allows us to create files with variables, use mixins and define common styles to several components and pages. Additionally, as with the automation tasks, using SASS considerably reduces the time of development and testing of styles.
On the other hand, we have ESLint, which is a code linter. A linter is a tool that is responsible for reviewing the code and is able to mark the errors and possible bugs that we can correct to improve our code. ESLint is based on rules that are totally configurable. It comes with a pre-established set of rules that we can use as a starting point and enable or disable any rules we wish. This allows us to maintain standards in the code across the developers and projects.
Now that we have the basics to create this workflow, let's open our favorite editor and get started...
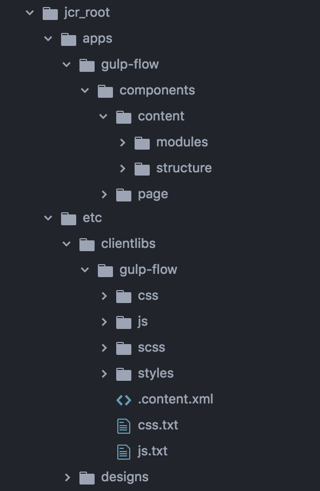
For this integration, we have defined the following folder structure:

Within the components folder, we will have all the components defined in two folders, modules and structure. The separation of these two folders allows us an organized structure and maintenance of components.
The modules folder will contain all the specific components defined by the business rules and the structure folder will have all the structural components of the site such as: header, footer, columns, etc.
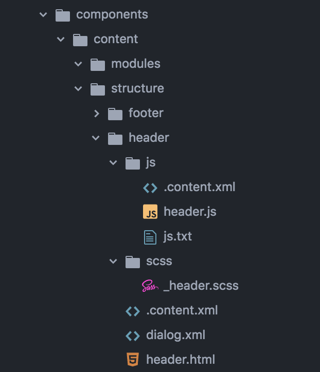
Then for each component we will have two folders, js and scss. Here we will define our javascript and scss file respectively. Those files will be independently compiled by the tasks that we define in our gulpfile.js file.
This structure allows us to have all the files of the component in one place, in this way its modification and scalability is easier.

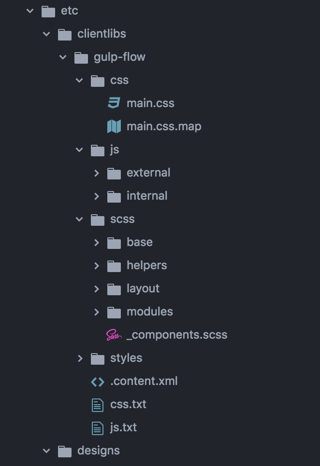
Now, for styles in general and libraries we will use the folder etc/clientlibs like you can see in the next screenshot. With this configuration we will have a more global and direct vision of where the javascript styles and functions are defined.

As you can see, we have these different folders:
- css
This folder will have the main.css file compiled and the main.css.map
When we work with preprocessing CSS languages, the task of making traces is more complex.
The file resulting from the compilation does not maintain any correspondence with our SASS source files. That's why we have to use CSS maps.
It makes the client-side code legible and debuggable even after combining, compressing and compiling it. Use source maps to assign your source code to the compiled code.
- js
/external: All the external js libraries like JQuery, Bootstrap, etc.
/internal: All the custom js necessary for the project. Example: main.js, utils.js, etc.
- scss
Here we have all the sass files structure for the project and the components.scss with all the imports sass files from the components.
- styles
This folder will contain just the main.scss, where we have to import all the files that we have on the scss folder.
Now let's discuss the folder structure for the SCSS files. A solid structure with clear organization will make us much more productive and faster when making any changes.
In this case the 7-1 pattern was used as a base, this standard has been implemented and perfected over years.
We have a base structure, however the files may change according to the type of project. The names of the files and folders can be changed to whatever you want. The key to this structure is that it allows you to keep your code separate from the components code.
scss/
|
|– base/
|   |– _base.scss           # General DOM selector styles
|   |– _reset.scss           # Reset/normalize|   |– _typography.scss     # Typography rules
|   ...                     # Etc...
|
|– helpers/
|   |– _colors.scss         # Sass Colors
|   |– _mixins.scss         # Sass Mixins
|   |– _utils.scss          # Utility classes, clears, show/hide
|   |– _variables.scss      # Sass variables
|   ...                     # Etc...
|
|– layout/|   |– _breakpoints.scss     # Breakpoints system
|   |– _grid.scss            # Grid system
|   ...                     # Etc...
|
|– modules/
|   |– _elements.scss     # Elements like buttons, inputs, etc
|   ...                     # Etc...
|
|– _components.scss         # Import sass files of components
Base Folders
In the base folder you should have the reset file, some typographic rules, and probably a stylesheet defining some standard styles for commonly used HTML elements.
Helpers Folders
In the helpers folder place all Sass tools and helpers used across the project. Every global variable, functions, mixins and placeholder should be put in here.
Layout Folders
In the layout folders is everything that is involved in laying out the site or application. This folder could have stylesheets related to the grid system, breakpoints, etc.
Modules Folders
In the modules folder there are smaller elements such as buttons, inputs, tabs, etc.
The _components.scss file
In this file we will include all the sass files of each component using the @import rule. The underscore _ in front of each .scss file is a way of telling the preprocessor to ignore those files and not compile them separately, because they are just parts of something else. For example, for our header component:
@import "content/structure/header/scss/header";The main.scss file
The file that will be compiled in CSS is the one that doesn’t have an underscore in front of it, the file name is main.scss. Let's see what the code of that file looks like.
This is the main file where everything happens, the main thing is to have imported all the scss files that we have defined in the base folders, helpers, layout, modules, etc. Here we are going to import everything and from it our final main.css will be generated, the structure is as follows:
/* Import helper files */
@import "helpers/variables";
@import "helpers/colors";
@import "helpers/mixins";
@import "helpers/utils";

/* Import base files */
@import "base/reset";
@import "base/base";
@import "base/typography";

/* Import layout files */
@import "layout/grid";
@import "layout/breakpoints";

/* Import modules files */
@import "modules/elements";

/* Components */
@import "components";
Gulp configuration
To add the gulp flow we’ll need to install nodejs and gulp-slang module to handle the auto-sling the files to AEM. The first thing you should do is install gulp both globally and at the project level. To install it globally, use npm as follows:
npm install -g gulpThen, we have to initiate the project and install some packages to handle the flow, on a terminal run the next commands:
npm initInstall all the utils modules:
npm install --save-dev gulp gulp-plumber gulp-options gulp-debug gulp-util gulp-watchInstall the styles modules:
npm install --save-dev gulp-sass gulp-sourcemapsInstall the ESLint module, we used the airbnb configuration for this and the Javascript style guide:
npm install --save-dev gulp-eslintFinally, the AEM related module that allows the auto-sling of the files:
npm install --save-dev gulp-slangAfter run ‘npm init’, we’ll have a package.json file on the root folder project and will have reflected the Node project settings such as Project name, Author, Version, Dependencies, Scripts, etc. All the npm packages that we will install next will be defined in this file for future installations.
Now we will configure the star of this article, our gulpfile.js.
We define the namespace of our project and we will require all npm modules installed previously:
var namespace = gulp-flow;

var gulp        = require('gulp'),
    watch       = require('gulp-watch'),
    gutil       = require('gulp-util'),
    plumber     = require('gulp-plumber'),
    slang       = require('gulp-slang'),
    debug       = require('gulp-debug'),
    options     = require('gulp-options'),
    sass        = require('gulp-sass'),
    sourcemaps  = require('gulp-sourcemaps'),
    eslint      = require('gulp-eslint');
Then we define all the paths of the project:
var root = 'ui.apps/src/main/content/jcr_root/',
    components = root + 'apps/' + namespace + '/components/',
    design = root + 'etc/designs/' + namespace + '/',
    clientlibs = root + 'etc/clientlibs/' + namespace + '/',
    cssPath = clientlibs + 'css/',
    sassPath = clientlibs + 'scss/',
    mainCss = clientlibs + 'styles/main.scss',
    cssBuild = cssPath + 'main.css',
    cssSrcMaps = cssPath + 'main.css.map',
    jsPath = clientlibs + 'js/internal';
For a console notification, we must use this function:
/**
 * Helper: options
 * Add options parameters in Gulp.
 */
function options() {

    var opts = {
        prod: false,
        debug: false,
        env: 'local'
    };

    if (options.has('env')) {
        opts.env = options.get('env');
    }

    if (options.has('debug')) {
        opts.debug = options.get('debug');
    }

    if (options.has('prod')) {
        opts.prod = options.get('prod');
    }

    return opts;
}
Now we need to set up our sass build task that will compile the main.scss file:
/**
 * Task: `sass:build`
 * Compiles the scss files.
 */
gulp.task('sass:build', function (cb) {

    var compressed = 'compressed';
    if (options().debug) {
        gutil.log('File ' + gutil.colors.cyan.bold(maincss));
        compressed = 'expanded';
    }

    gulp.src(mainCss)
        .pipe(plumber()) // Prevents pipe breaking due to error (for watch task)
        .pipe(sourcemaps.init())
        .pipe(sass({
            outputStyle: compressed,
            omitSourceMapUrl: true, // This is hardcoded in the main.scss due to resource path issues
            includePaths: [sassPath, components]
        }).on('error', sass.logError))
        .pipe(sourcemaps.write('./', {
            addComment: false
        }))
        .pipe(plumber.stop())
        .pipe(gulp.dest(cssPath))
        .on('end', cb);
});

/**
 * Task: `sass:sling`
 * Slings the compiled CSS and sourcemaps to AEM.
 */
gulp.task('sass:sling', ['sass:build'], function () {
    return gulp.src([cssBuild, cssSrcMaps])
        .pipe(slang());
});

/**
 * Task: `sass`
 * Runs the sass build and slings the results to AEM.
 */
gulp.task('sass', ['sass:build', 'sass:sling']);
Next, we create the task that will check all the javascript code looking for warnings and errors:
/**
 * Task: `js:eslint`
 * Lint the javascript files.
 */
gulp.task('js:eslint', function () {
    return gulp.src([components + '**/*.js', jsPath + '**/*.js'])
        .pipe(eslint())
        .pipe(eslint.format());
});
The last of all is our watch task that will check changes in all the files we have, both components and those defined within, etc.:
/**
 * Task: `watch`
 * Watches the HTML, Sass, and JS for changes.
 */
gulp.task('watch', function () {

    var jsWatch = gulp.watch([components + '**/*.js', jsPath + '**/*.js'], ['js:eslint']),
        sassWatch = gulp.watch([components + '**/*.scss', mainCss, sassPath + '**/*.scss'], ['sass']),
        markupWatch = gulp.watch([components + '**/**/*.html', components + '**/**/*.jsp']);

    gutil.log('Waiting for changes...');

    // Check changes for javascript files
    jsWatch.on('change', function (ev) {
		gutil.log('Javascript changes on ' + gutil.colors.cyan.bold(ev.path));
        return gulp.src(ev.path).pipe(slang(ev.path));
    });

    // Check changes for SCSS files
    sassWatch.on('change', function (ev) {
	    gutil.log('SCSS changes on ' + gutil.colors.cyan.bold(ev.path));
        return gulp.src(ev.path).pipe(slang(ev.path));
    });

    // Check changes for HTML files
    markupWatch.on('change', function (ev) {
	    gutil.log('HTML changes on ' + gutil.colors.cyan.bold(ev.path));
        return gulp.src(ev.path).pipe(slang(ev.path));
    });

});

gulp.task('build', ['sass:build', 'js:eslint']);
We finished the configuration of our environment and now we have the following tasks at our disposal to execute:
- gulp watch - Watches for changes to Javascript, SASS, and HTML files, and slings the result to AEM.
- gulp build - Builds all Sass files and check the javascript files for errors.
Generally gulp watch is used, because it enables agility in development and changes reflect instantly in the browser.
In summary, we have seen how through use of a very simple tool, we can get an optimized web, facilitate work to the developers, and achieve an improvement in the processes of definition of structures.
We can also continue to improve all this thanks to Gulp's large community. Gulp has hundreds of plugins for many diffeent tasks. We can easily search the NPM directory to find the one that best suits our project preferences.
We hope this post was helpful to you! If you want to dig deeper, check the Gulpfile.js on Gist or any of the projects on this repo. Stay tuned for more development tips and tricks!
If you need help with Adobe Experience Manager projects, or if you think you have what it takes to join our team, we'd love to hear from you.
Topics: Adobe Experience Manager, Developer Think Tank, Development
Ariel Benz
As an AEM UI Developer, Ariel loves to work with his fellow teammates in order to deliver the very best results. He takes this passion with him to the kitchen, where he crafts the best Argentinian cuisine.


