
Bruno Szumpich, May 31, 2019
The Smart Tags feature is a great way to increase the accuracy and efficiency of search in AEM by adding metadata tags to image assets and then uploading into dam folders.
Throughout this post we will cover a list of questions that help explain the Smart Tag features and when they should be applied. These questions are followed by detailed instructions on how to apply and incorporate Smart Tags into your workflow.
What does the Smart Tags feature do?
This feature provides the ability to automatically add tags to an image asset each time it is uploaded. This feature intelligently scans the image and based on the results of the scan it adds specific tags.
How can it improve the asset search?
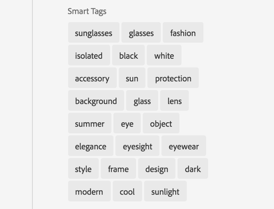 When an asset is tagged, the asset search can use these tags to get results. In the following example we uploaded an image of sunglasses. After a few seconds the feature automatically added the pictured list of tags.
From this, if anyone searches a word included in the Smart Tags list the results will include the sunglasses asset.
What happens if the Smart Tags list contains an inaccurate/undesirable tag?
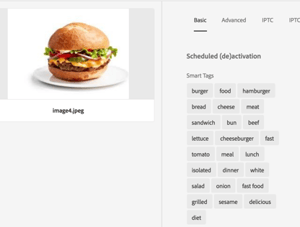
If a tag in the Smart Tags list is wrong or undesirable, authors have the ability to remove it from the list. For example, a marketing department most likely wouldn't want a picture of a hamburger to be tagged as "unhealthy" and in that case the author can remove it. Fortunately, these actions will train the tool to prevent similar situations in future assets.
Is there a way to set priorities on assets that contain the same tags?
Yes, there is. Authors can promote a tag into the asset Smart Tags list in order to prioritize that tag. Promoting a tag for an image increases the chances of that image appearing in search results when a search is performed based on the particular tag.
The Smart Tags feature is continuously learning.
Based on the author’s help, the Smart Tags feature is continuously learning. Each time an author deletes or promotes a tag the tool improves the accuracy of the tags that it will include in the future.
Do Smart Tags apply to the whole DAM folder?
No, it is configurable. It can be applied in any folder inside the dam content.
When do Smart Tags run?
Any time you'd like as they are configurable. It's easiest to run the tags each time an asset is uploaded but this step can be applied to any workflow in your asset process. It's also possible to run the tags as a stand-alone process if that is the expected behavior.
Which kind of asset files are usable for Smart Tags?
The Smart Tags feature solely works for image assets. Currently, tags can only be applied to assets with the following MIME types:
image/jpeg, image/tiff, image/png, image/bmp, image/gif, image/pjpeg, image/x-portable-anymap, image/x-portable-bitmap, image/x-portable-graymap, image/x-portable-pixmap, image/x-rgb, image/x-xbitmap, image/x-xpixmap, image/x-icon, image/photoshop,image/x-photoshop, image/psd & image/vnd.adobe.photoshop
*Note* Smart tagging of asset renditions is only supported for the following MIME types:
image/jpeg, image/pjpeg & image/png
Smart Tag Asset Lists Created Automatically
The following are examples of smart tags working on images entirely different from one another:
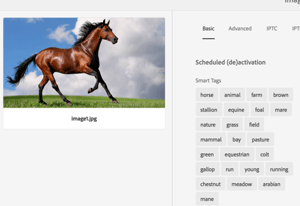
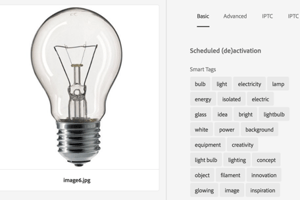

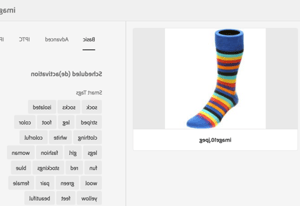
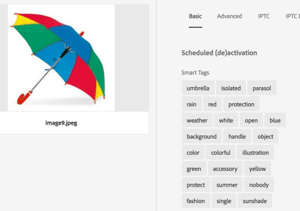
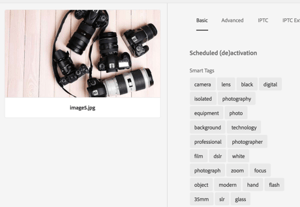

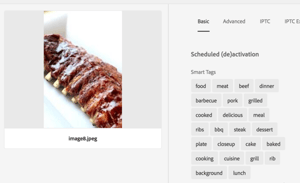
The above examples are tags that were created automatically without any user/author interference. However, as it is an automatic process there are certain cases were a physical person may have to assist- similar to the situation below.
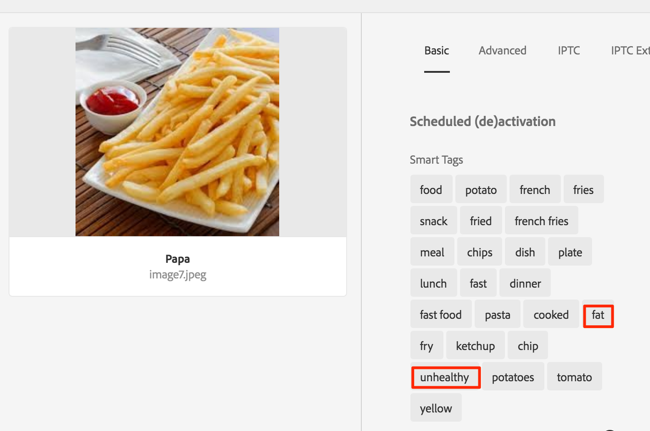
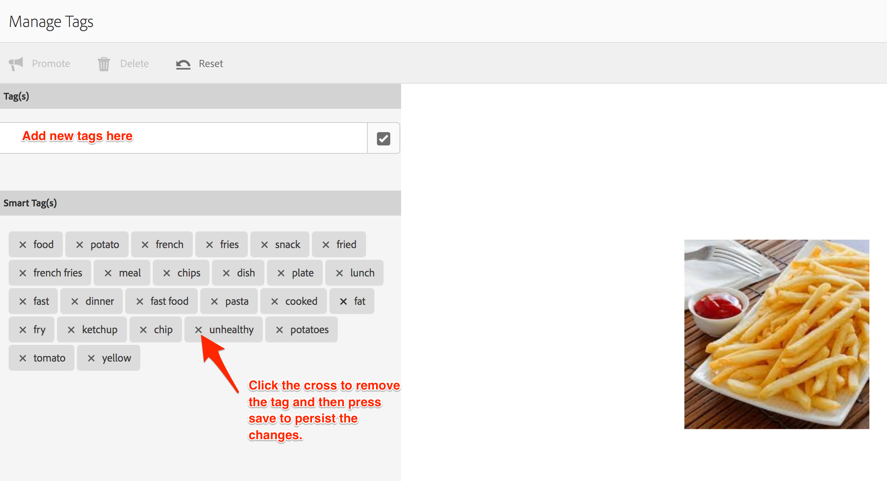
As previously mentioned, there could be tags that are accurate yet not wanted in the business. In that case we can remove those tags by selecting the image and going to Manage tags. Once there the user can remove, promote and/or add new tags (see photos below for a demonstration). This process is how the Smart Tags feature learns to adapt for future cases.


How to Configure Smart Tags In an AEM Instance:
Prerequisites-
Before you can use the Smart Content Service you must ensure the following to create an integration on Adobe I/O:
- Maintain an Adobe ID account that has administrator privileges for the organization ✔
- Enable the Smart Content Service for the organization ✔
- Install AEM 6.3 latest service pack or higher AEM version with its latest service pack ✔
Create a Public Certificate-
A public certificate allows you to authenticate your profile on Adobe I/O.
- From the AEM user interface, click the AEM logo, and go to Tools > Cloud Services > Legacy Cloud Services.
- In the Cloud Services page, click "Configure Now" under Assets Smart Tags.
- In the Create Configuration dialog, specify a title and name for the Smart Tags configuration. Click Create.
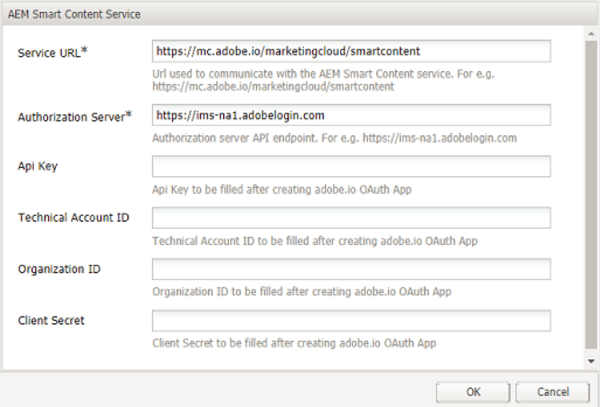
- In the AEM Smart Content Service dialog, use the following values:
Service URL: https://mc.adobe.io/marketingcloud/smartcontent
Authorization Server: https://ims-na1.adobelogin.co
Leave the other fields blank for now (to be provided later). Click OK.
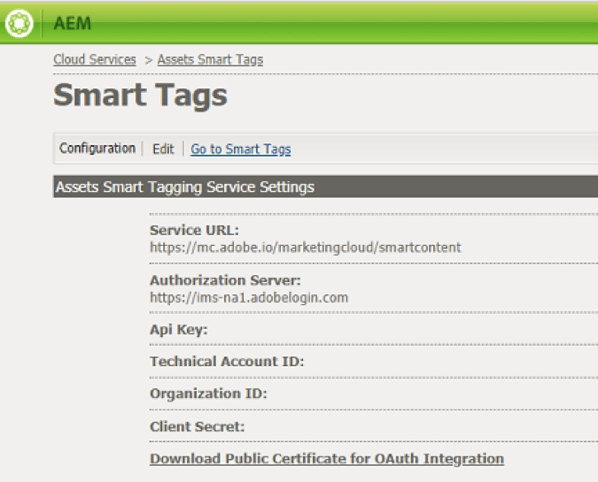
5. Click Download Public Certificate for OAuth Integration and download the public certificate file AEM-SmartTags.crt.
Create Adobe I/O Integration
To use Smart Content Service API's create an integration in Adobe I/O to generate an API Key, Technical Account Id, Organization Id, and Client Secret. This step can be skipped if there's already an Adobe I/O integration created for “Smart Content”.
- Access https://console.adobe.io.
- From the Integrations page select your organization.
- Click New Integration.

4. On the Create a new integration page select Access an API. Click Continue.

5. Under Experience Cloud select Smart Content. Click Continue.
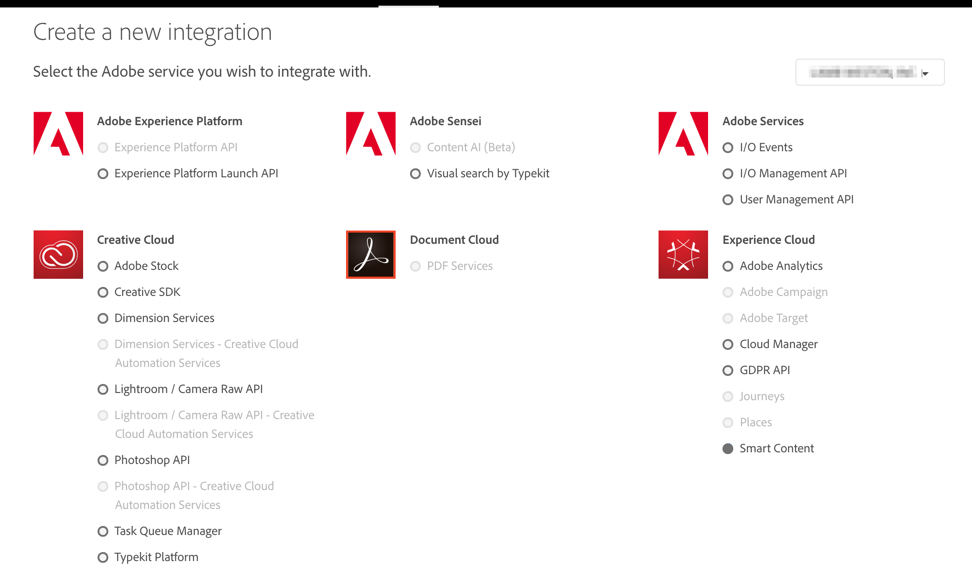
6. On the next page select "New integration". Click Continue.
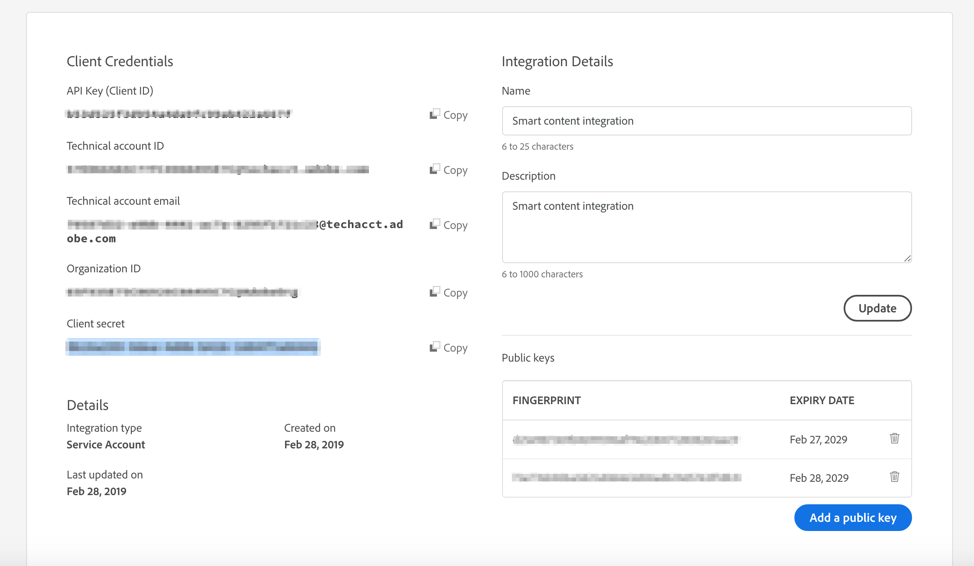
7. On the Integration Details page specify a name for the integration gateway and add a description.
8. In the Public keys certificates upload AEM-SmartTags.crt file that you downloaded above.
9. Click Create Integration.
10. To view the integration information, click Continue to integration details.
Add a public key to an existing smart content configuration
If a new server has to be configured to use the smart content configuration, then a new key has to be added to that configuration as well. Here's how to do just that:
- Create a public certificate for the server and add it to the smart content configuration. To do this, you'll need to follow the steps in “Create a public certificate”section.
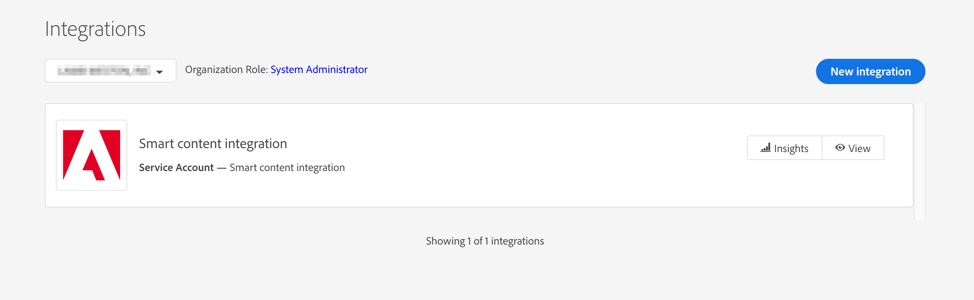
- Go to https://console.adobe.io/integrations and from the drop-down list select your organization.
- Click on Smart content integration.
4. Within the Smart content integration, click on the “Overview” tab, then click add a public key. Then, look for the public certificate created on the step 1.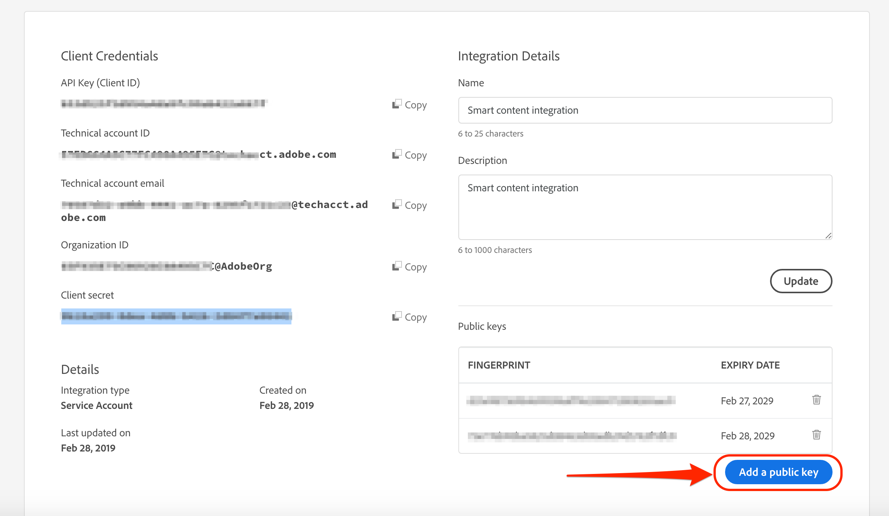
Select folders to apply Smart Tags.
It's possible to set which asset folders should apply Smart Tags and which folders should not. See instructions below.
Important: Take into account that enabling Smart Tags in a folder is also enabling Smart Tags in it's sub-folders.
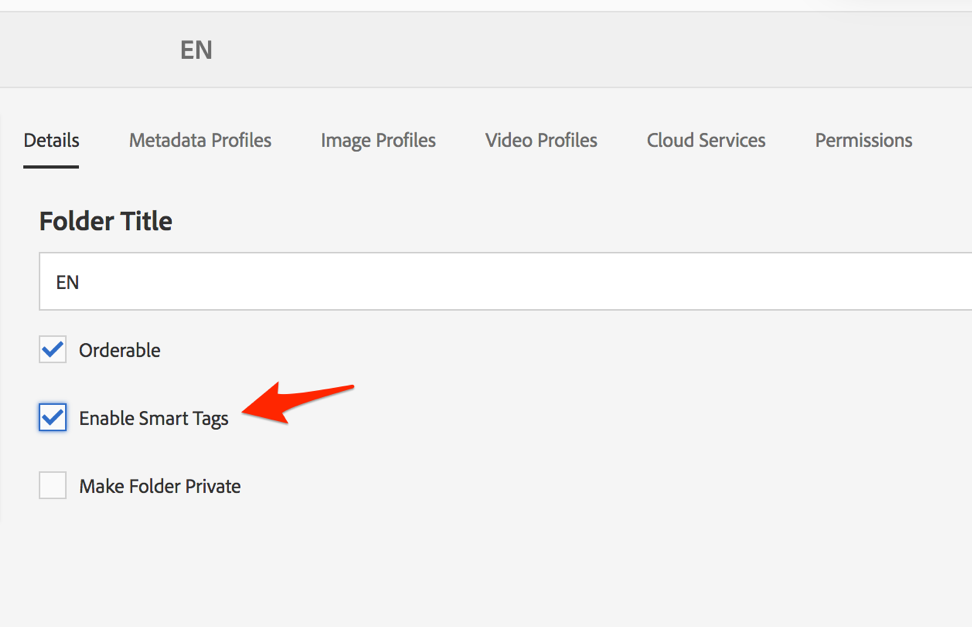
- Log into the site as an author
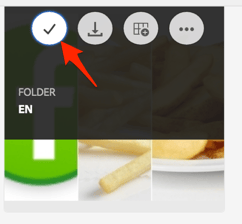
- Click on Assets and then Files.
- Select the folder that should apply the Smart Tags.
- Then click on “Properties (p)” on the top navigation bar
- Check the “Enable Smart Tags” checkbox and then click on save and close button.
Enable Smart Tagging In The Update Asset Workflow
The following example demonstrates how to add Smart Tags to the DAM Update Asset workflow. Note- with the same steps, it can be applied to any workflow.
1. From the AEM Assets UI go to Tools > Workflow > Models.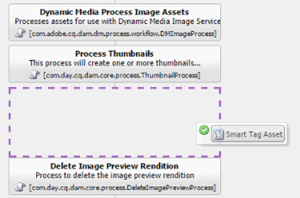
2. From the Models page select the DAM Update Asset workflow model.
3. Click Edit.
4. Drag Smart Tag Asset Process (available under the DAM Workflow section) from side kick and place it after the Process Thumbnails step.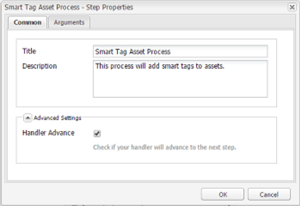
5. Double-click the step to edit it.
6. Under Advanced Settings, ensure that the Handler Advance option is selected.
7. In the Arguments tab, select Ignore Errors if you want the workflow to complete even if the automatic tagging step fails.
 To tag assets when they are uploaded irrespective of whether smart tagging is enabled on folders, select Ignore Smart Tag Flag.
8. Click OK to close the process step, and then save the workflow.
Conclusion
If you'd like to learn more about Smart Tagging - or anything else Adobe related, you've come to the right place. We’re an Adobe Global Alliance Solutions Partner, and 2019 Digital Experience Solution Partners of the Year. We're are 100% committed to helping our customers achieve great success with Adobe Experience Manager. We'll happily answer any questions you have about AEM Sites, Assets, Campaign, or Managed Services - get in touch anytime.
Topics: Adobe Experience Manager, AEM, AEM Smart Tags