How To Use AEM Assets In A More Streamlined Way, Part 2
Paul Legan, May 17, 2016
This post is the follow-up to Part 1 of the transcription from our Webinar: How To Control And Deliver Your Digital Assets From Anywhere. Feel free to read Part 1 .
Webinar speakers:
Vebeka Guess, AEM Product Marketing Manager, Adobe
Paul Legan, Managing Partner, 3|SHARE
Ben Cherian, Senior Developer, 3|SHARE
[Transcription]
Vebeka: The secondary challenge we're going to address is how to make sure that your organization can use your Digital Assessment Management System effectively to streamline some of those content creation workflows, as well as actually searching and finding the assets and making them easy to find and use.
And then third, we're going to show you how to address the challenge of making assets available, asset renditions available for any screen or content type. So for instance, a lot of times creative producers are creating 10, 20, 30 different renditions of a particular asset for the channel and its needs. So for print, you have to have a certain format and rendition that's different from web, etc. or different from mobile. We're going to show you how to use dynamic media to actually create those renditions on demand so that you're saving in terms of creative production cost and storage of those assets.
I'll turn it over now to Paul Legan to continue the webinar content.
Paul: Thanks Vebeka. With any luck, once an asset has been imported all of a sudden it becomes part of a project, or again most likely part of many concurrent projects.
AEM Projects is another module that allows you to basically assign a group of people to a set of tasks that are all working towards a common process or end goal. And so within the AEM Projects interface, as you can see right here, there is the ability to start a workflow and immediately see who is responsible for which tasks, and what tasks are on progress and what tasks still need to be completed.
Now common projects within AEM that we've seen are, let's say for example at work, one of the examples we gave earlier was this idea of a work order process. So a request comes in for you either internally or a vendor externally to create a set of photos or a set of graphics for a banner. It's very easy within AEM Projects to create a project that has a workflow that includes all of the review steps, all of the optimization steps for those photos and ultimately all the distribution steps for those deliverables, all contained within one project and assigned to a variety of people.
AEM Projects interface itself which you can see on the left here is completely customizable. There's a set of nodes from a developer's perspective, there's a set of nodes within the repository that you can overlay to change everything from the left-hand navigation to the columns on the right, as well as the display of each of the tasks within this interface. So by default, tasks are arranged by workflow and they're sortable by assignee, priority, due date. And again, you can extend that however you would like.
In the example you see here, we've added a column for any resource on a given project to claim that task. And so what that means is there was a scenario where because we generally try to assign tasks to groups, for a couple of reasons, it became clear that people were running up against each other when they were trying to work on a task. So we needed to create a way for a specific user of that group to claim the task so that everyone else can step aside and let that person continue on.
Now the reason why we generally recommend assigning tasks to groups if at all possible or multiple people at least is because, let's be honest, in the middle of summer on a Friday, you may not be able to get a hold of half the company because it's a nice day again and everyone's out. So it's good to have fallback responsibilities or roles so that everyone can do what they need to do to get the project done. So this entire interface is customizable again through overlaying the nodes that are provided at the box.
Back to the actual asset. We talked a little bit about asset metadata when we ingest it but the entire life cycle of an asset is it's probably just as important if not more important than the upload, initial upload. So as assets make their way through a workflow process, users can annotate and comment. And that all has no effect on the actual original.
Now the important part is that data is saved along with the asset. So in that call out there in the middle, you'll see that within the repository when I've made a comment that says remove this cloud, and you can see that I've circled the cloud, that comment is stored with a variety of different data points. For example where the annotation is, what type of annotation it is circle.
Also, all that information is stored with the asset and this provides a myriad of different options. For example, for you to notify anyone who's worked on the asset via email or via the workflow inbox within AEM that the asset has been modified or commented on, all these assets, all this data is available for external consumption. So we've had example where clients want to syndicate all of their comments to an external system that will ultimately display all those comments in a beautiful way.
But why is this important? I keep going back to this metadata in general. Because everything in AEM is searchable. This helps, really two scenarios, this helps I guess most importantly. One, when users are in the system, if they can't find assets, the system is nearly worthless. It's a shared drive. I think we've all looked at a shared drive at least once in our careers and seen thousands of assets with cryptic names and absolutely no idea which one is which without looking through a thumbnail view or something.
But because all of this data even comments are restored within the repository and is searchable, you can easily find things and find what you've done in the past. Again if you've come back from vacation after a week, you generally, if you haven't forgotten all your passwords by then, you will be able to pick up right where you left off. And this is really critical to actual distribution.
Because everything is searchable, everything is easy to organize so you can make use of smart collections which are programmatically created or manually created. Now smart collections are similar to, not to use iTunes again, but iTunes smart playlist. So let's say a photographer, an external vendor uploads another thousand assets that pertain to a particular event. That smart collection that you've created that ties to that event will automatically get uploaded and shared to everyone.
And because its interface again is just a sequence of nodes, essentially XML data within AEM's repository, you can easily extend it to meet your needs. We did a proof of concept for a client where we did object recognition to automate tagging of individuals in this particular photograph.
Now this was again a proof of concept, but the idea is that you can see, we've added a button to show or hide faces in the top navigation, and immediately we've already been able to tag specific objects within the photo. Again, all of this information can be stored with that photo, and can be used either through a distribution channel, or to target a specific distribution channel, or to interact with external systems like ecommerce systems. So with all this data, we can report on our progress.
I know there was a question earlier about analytics tagging in workflow automation. So there's definitely some analytics information that can be imported or tagged as part of ingestion, but also as users are downloading and utilizing assets on a variety of different deliverables or different projects, there are out-of-the-box reports which you can see on the left, and then there are custom reports that you can build using the reporting framework.
We have clients that often want to report on which assets require additional help, whether that means they haven't been tagged properly, or the assets are missing information about where they came from. All of that information is easily audited and also exposed within a user interface.
Ultimately what this does is it reduces duplication of effort. I've seen countless examples of organizations who utilize different photo shoots to take...essentially, they have two photo shoots that are showing the same thing and can be used in the same marketing material. So legally they can be used in multiple countries or in multiple organizations, but they're unable to find those assets, and therefore they actually have to create another photo shoot with another vendor, and this ultimately causes a lot of friction between groups. Again, so this information all can be used to reduce production costs.
Now I'll turn it over to Ben to show a little bit more about custom order requests and asset workflows.
Ben: One of the new features in AEM is Projects. And since this has come out, I don't think there's any other Asset projects that I've worked on that hasn't utilized this. It basically allows you to put all of your processes for reviewing and managing your assets into one system before it gets released to be used by external users.
Within AEM, there are several projects out of the box that it comes with. For this, we've created a custom project. And what it does is when you first enter in and create project, there's some form data that needs to be filled out. There's the simple title that you can fill out with the vendor's items here to decide which group are we assigning this to, and when we've customized this to have a subset of groups.
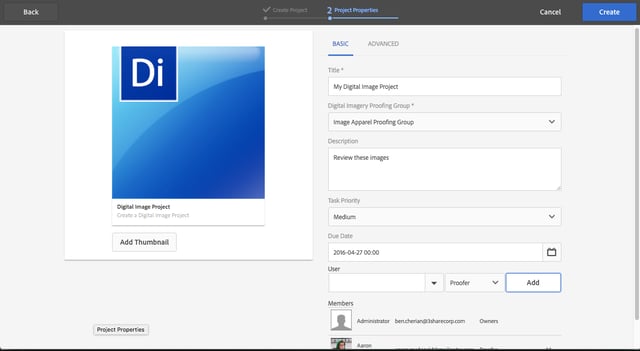
You can put in a description. You set the priority of the project. You can set a due date for the project as well. And you can also add additional members from within AEM users that need to be involved in this project, whether it be photographers or editors or reviewers. And then it creates a project.
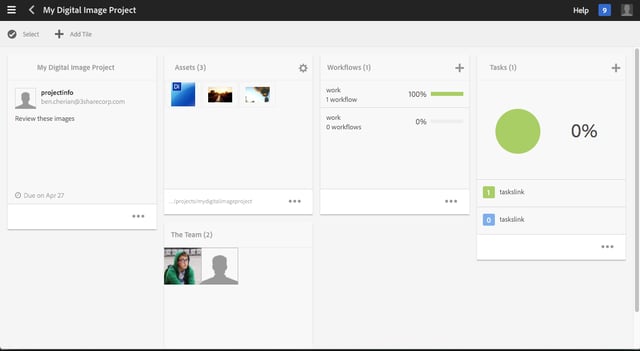
And now we'll see the card view that Paul was showing before. Here are our assets. We don't have any assets in here right now other than the thumbnail, so we can easily add new assets in here and drop them right in, and they're ready for review. If we go back into our projects, we don't have any tasks yet, any process started, but we can create a new workflow. And this workflow is our proofing workflow and this is where all of our steps for this project will be contained as far as when it gets assigned, to who.
Then we'll create our workflow. And now that we've created a workflow, we have tasks. So workflow, we use workflow in AEM, there are different steps. A task is a specific step within AEM, within that workflow. Here's a proof image and annotate, assigned to this proofer group. Here's our priority.
And if we click on this task, there's a button here to select images. And we can reassign this to an individual or to another group, if needed. And we're going to select our images. We can click on them and approve them. We can click on them and reject them. And if we need to, we've added a button here to go to the annotate UI. So we can click on this. We can select an area. And we can specify that we want brighter flames. And we see the annotation that has come up on the side here. You hit Done and then we hit Compete.
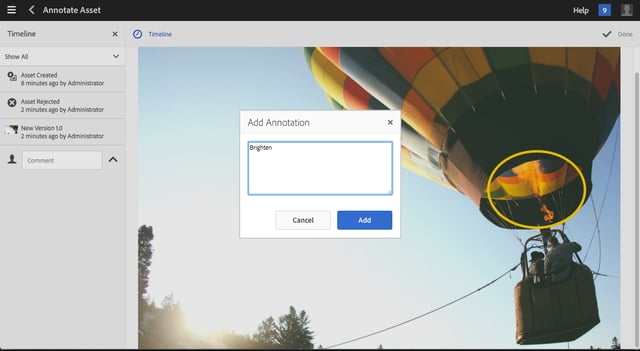
What we've done with this is since there is an item that has been rejected, we've started a new workflow, a new task so that that remaining item can be reviewed. Now, there's a lot of steps here to be able to add items in here. One of our other projects, what we did was we created a hot folder system where basically in order to create that project, it's already a structured system where we kind of know all the metadata that needs to be filled in for that project.
Now we've created this hot folder, we can just drop in these assets in here. And as soon as we drop in these assets, if I go in to project review and refresh, it's created a new project for that comp folder. And it's auto-populated and filled in, and the workflow, and the tasks, and the steps, and the automatically assigned items to different people.
Projects are a great way to make repetitive workflows and processes simpler and easier. It will cut down the amount of paper documentation or manual email that you'll need to send back and forth, and allow teams to work together more efficiently to manage these assets, and review them before they are released for public use.
With that, I'll turn it back to Paul.
Paul: Thanks, Ben. That's really helpful to illustrate exactly the different ways that you can utilize projects in workflows in your creative process.
We've spoken a lot about how to actually get assets into the system and then how to manipulate them and manage them when they're in the system. But in reality, it's time to now distribute those assets that we've worked so hard to create. Because at the end of the day, projects are useless without the results or without the deliverables that ultimately generates revenue for a business.
Organizations need to provide for a variety of distribution channels, and many times the audience is different across those channels. In fact, these channels can and do span multiple devices types. And often there is a requirement to dynamically adapt to either bandwidth restrictions or device limitations.
We have a variety of different use cases here. So some clients rely heavily on retailers or external vendors to sell their wares. So an audience could be that a retailer is looking for imagery for marketing or advertising campaigns. From an internal perspective, you'd want to track exactly where those assets are being used. And from an external perspective, if you're looking to sell more of a product, you want the easiest way to get the imagery that you need in order to do stuff.
Or an audience could be more internal. Perhaps a company wants to make sure that their internal audience is adhering to corporate branding guidelines. And so in that case, all presentations need to have standard logos or other branding materials. So there are a host of clients that use this on an intranet level to distribute consistent messaging.
Or finally the channel could be something like a legacy system provided by a partner via FTP or some other secure channels, where you have less control over where that asset goes or is used, but again the interface remains the only thing that really changes.
Now building on this, there is this concept of dynamic media and it's powerful. Dynamic media transforms an asset to meet specific requirements. And let's just say that most agencies may not need the same types of assets as partners or resellers. So within AEM Assets and dynamic medium, that integration allows you to create presets to deliver formats optimized for each channel.
Let's say you have a particular image, let's call it just a Photoshop file, but you don't necessarily want to distribute the original Photoshop file to everyone. Oftentimes you don't. But you do want to, let's say, have a high resolution PNG or a TIFF file that is used within the presentations, and maybe a lower resolution thumbnail that's used in kind of more internal communication.
Image presets allow you to define all of that information up front, and then external systems like ecommerce systems, or again external vendors can consume those via a friendly URL to display elsewhere.
It's important to note that in the beginning, I mentioned that oftentimes you don't need to migrate all of your assets at once as part of an initial migration. And additionally, you don't need to take all of your assets necessarily because you may have already created manual or offline renditions of each asset. But with dynamic media, as well as the built-in AEM Assets renditions that are created upon ingestion, you can save significant storage space by creating these renditions for specific channels on demand.
Again, in this case with dynamic media, the possibilities are pretty much endless. But we see a lot of different use cases surrounding mobile devices specifically, or bandwidth-restricted devices, where let's say if you're integrating with AEM mobile, for example, you'll want to make sure that the images that are pulled in are smaller and maybe a lower quality depending on the device than desktop users.
In addition to transforming the actual follow-up on that, AEM Assets provide several ways to secure content, or stagger its release to different consumers. And this is through the use of several things, one being watermarking, another being just DRM or license acceptance, and then finally permissions.
On the left-hand side, you'll see that AEM Assets provides copyright management tools. So if you try to download an asset or a vendor tries to download an asset within the authoring interface as well as the publisher asset share media portal interface, you can force that user to agree to a license. And that license can be stored on the asset as well as perhaps on the folder or on a group of folders. So there are a couple of different options there, and again, you can build all this out completely as you need and based on your requirements.
But a very common scenario is the requirement to release certain assets, usually the original files to partners or high profile partners before releasing the more low res version to the general public. And so on the right, you see an example for one of our customers where we have provided a simple interface on the asset itself, and again, this can be implied either by at the full level so that every asset gets these properties when something is uploaded to it, or it can be on the file level again. But the idea is that there's an interface for users to stagger the release of content depending on who needs to get it and when.
Finally, these workflows keep cropping up and it's really the most powerful part of everything. Workflows automate parallel distribution. So what I mean by that is let's say you've taken a tremendous amount of time to actually go through and create these assets and they're ready for distribution, you don't need to necessarily concern yourself with how the assets gets to where they need to go.
In the workflow in this example, we have created, for one particular client, the ability to publish the content through an asset share, which we're going to talk about in a second. It's essentially a branded media portal for users to log into. But also in this case, we published a final collection of assets to a partner FTP site. So you can create these process steps within a workflow to handle those two tasks in parallel.
And so finally, and this is not something I would do, but unless you're monitoring an FTP site or monitoring changes to an actual website like an asset share, you probably need a little nudge in the direction of the site when something is actually new.
A common request is to email some sort of notification that there's a new collection to the owners or subscribers of that content. So again, email notifications are built into the system, but you can also automate the distribution of those emails or notifications whenever a particularly significant action occurs within the system.
Finally and one thing that we're going to talk about a little bit more via demo is the out-of-the-box asset share page that Adobe provides. So the asset share is a fully functioning media portal for users, external and internal, to log in and subscribe to content or download content in a branded interface that matches the guidelines of a particular organization.
This interface right here I'm showing you is the actual out-of-the-box example with it, but really what you do is you apply your custom branding. You set up the filters that you want to show that pertain to the...again, it kind of goes back to the taxonomy that you described earlier in the process. But you set up the filters, you set up which assets are considered for distribution, and then you publish your assets from author to publish, again, during either an automated process like Ben showed, or something more manual. And finally you extend based on user feedback and based on the needs of your users.
So with that, again I just want to stress, there are so many different channels, and so many different devices that can connect to each channel when you're talking about distributing assets. And this is just one of them, but this is something that we see most common, and it's one of the most flexible.
Ben, maybe could you spend a couple of minutes talking about how to customize the asset share?
Ben: Yes. So this is an asset share page. And this is again an end user will come in and after the content creators created a content, uploaded it, gone through that review process to the projects. Now these are made available for others to be able to search, find and download the assets they need to use in their own projects.
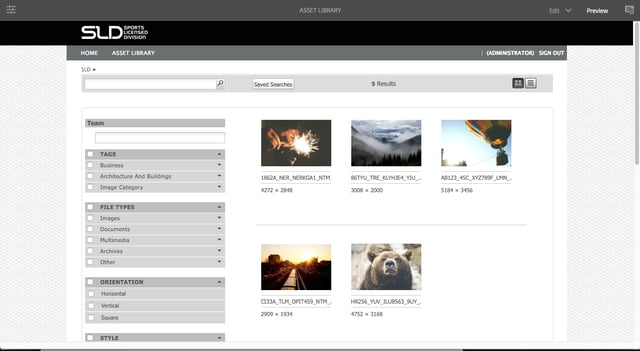
This asset share page provides ways for them to view these assets, that they can search through these assets using the various filters. And there, they can use by the orientation, style, when it was modified. There's different ways for them to filter and search. And there's more fields you can add in here.
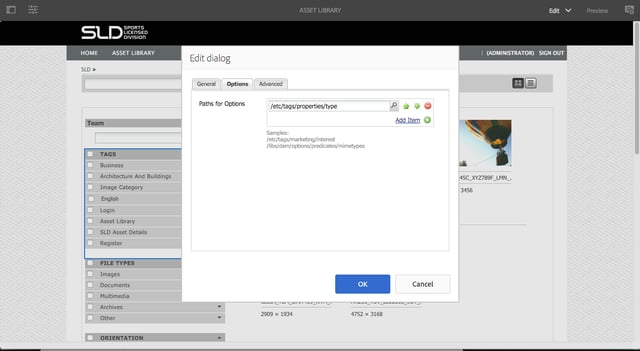
What we want to do here is add an option to search by those tags or the categories that we imported using our folders. So I'm going to create, add in the tags that we created during our ingestion of these assets. And now we have this in this category section. If I switch into preview mode, and I expand this, you see here are the folders that we had previously that are now tagged. And if I click on one of these, then it filters out just the outdoor images. And I can add the nature ones as well. I can remove the outdoor ones. And so this filtering allows me to quickly find the right assets I need for my project.
Once I've found them, I can add them to a lightbox. So that's another item that you can add in here. And to add in, it's really simple just to add in a component. Here's a Lightbox Action. And we can add this down at the bottom here, and now we've got a lightbox. And there are some items that I've added from before, but I can go in here and click on this asset, and click View Asset to view the details of the asset. Here, I've got the tags and some of the metadata in here.
We can add more fields that we want to be visible, we can also remove fields if we don't want them to be visible. It's already in my lightbox, I can remove it, or I can add it. And if I go back to the Asset Library page, I can see my assets here. I can download these assets in a zip file that I can use later on.
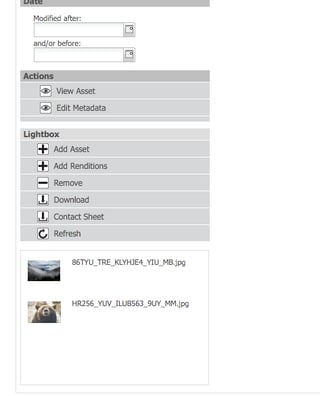
I can also view a contact sheet. I just need to refresh here. If I click Download, here's the zip file that I can download, and then it'll save, and that will contain my images. And this is the customization we made for a client where we can actually view a PDF contact sheet that can be downloaded and printed. It can be emailed and shared with all the users, and you can customize the metadata in here as well.
There are lots of options you have with the asset share page to make these available to end users to allow them to find the assets they need to be able to continue their own processes that are outside of the content creative processes.
And with that, I'll turn it right back over to Vebeka.
Vebeka: Thanks so much Paul and Ben. That was an amazing demonstration and deep dive on how to use AEM Assets in a more streamlined way. And thanks for showing us as well all the different options for streamlining the asset ingestion during the asset migration process. It's really important to ensure that your end users are able to upload assets, as well as maintain all the metadata that they need and the right structure and format, to be able to ultimately search and find those assets in the future.
And then secondly, thanks for showing us how to facilitate collaboration across the various organizations with workflows to help produce and manage content through that life cycle of getting an asset reviewed and approved, and culminating and collaborating around it. It's really important to show how both creative professionals and marketers can collaborate there through this tool. And then third, you showed us how to deliver assets to any channel in the rendition, in the right format that's needed at that time.
---------------
This transcription is the second half of the Webinar: How To Control And Deliver Your Digital Assets From Anywhere. Read Part 1, or access the full recording of this webinar.
You can also download our guide which will help you get a jump start on your DAM implementation:
Topics: Adobe Experience Manager, Digital Asset Management (DAM), Developer Think Tank, Webinars


