AEM ui.frontend Module: Code Splitting, Dynamic Imports and TypeScript
Lucio Poveda Bertos, April 27, 2022
Breaking Down the Monolith
Nowadays being performant on page load is critical. A fast page load speed is critical to achieve a strong SEO ranking and Lighthouse score. A common way of decreasing the time it takes for a page to load is reducing the page's file size using minifiers and compressors. These tools do a great job of reducing the size of the files, but we can go even further to make sites run even more efficiently. As I'll describe below using a technique offered by most bundlers, Code Splitting, that divides large JS bundles into smaller modules that can be lazy loaded as needed, developers can improve page load speed and deliver updated content even more efficiently. At the same time, code splitting will provide the additional benefit of not having to re-load a huge bundle every time there is a small change on a single file/component. With a split bundle the browser will know what file has changed and re-load it independently.
While working with JavaScript bundlers such as Webpack, you have available different approaches or techniques to break the main bundle into smaller pieces. For Webpack one of them is to let the compiler know what files you actually want to split from the main bundle.
Let's see how Webpack defines what code splitting is: Code splitting is one of the most compelling features of webpack. This feature allows you to split your code into various bundles which can then be loaded on demand or in parallel. It can be used to achieve smaller bundles and control resource load prioritization which, if used correctly, can have a major impact on load time.
Webpack uses two techniques to achieve code splitting:
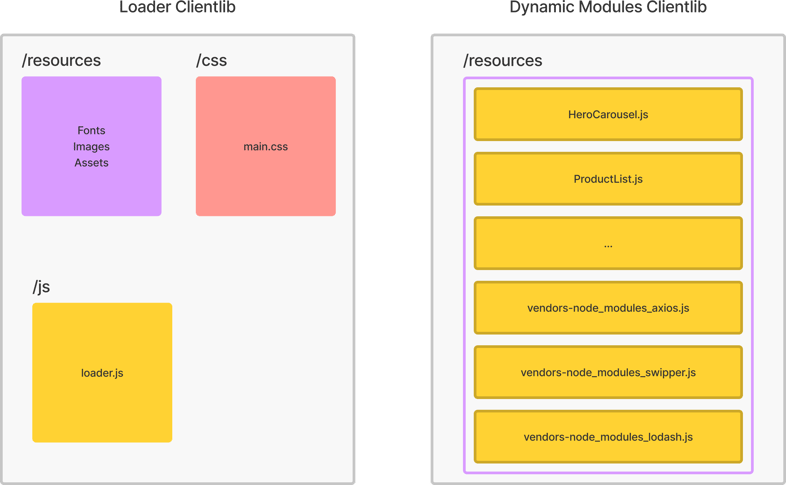
Although ES6 Syntax is the recommended way for creating and importing bundles, we will use the Webpack-specific approach require.context that gives us a map of components (files) within a specific location. With the list of components we want to detach from the main javascript file we can create a new clientlib which will be acting as a provider while our main clientlib will only contain a small JS file that will act as the loader. This loader will have the necessary logic to know where each module is located and when to call them through an HTPP call from the browser.
Preparing our fresh installed AEM ui.frontend module to support code splitting and Dynamic Imports along with TypeScript
- Install Webpack types definitions.
- Create a new clientlib to host splitted bundles.
- Inform the Webpack compiling process what files should split from the main bundle.
Our final clientlib diagram will look like this:

To make this compatible with TypeScript we will need some types definitions first.
npm i -D @types/webpack @types/webpack-env
To achieve this configuration we should modify the aem-clientlib-generator config file clientlib.config.js to create the new clientlib with the dynamic-modules.
Once we created the new configuration for the clientlib now we should tell Webpack how to bundle our TS files and where to put them. For that we will modify the webpack.common.js from this:
To something like this:
Here we are telling Webpack several things:
entry.loader - Clientlib name and where to find its entry point.
output.path - Root directory for the compiling process' output.
output.filename - Function that represents how all the clientlibs-[entry] folders should be constructed (except our chunks-generated clientlib-dynamic-modules).
output.chunkFilename - Where the chunks generated by require.context should go.
output.publicPath - Where the Loader should look for the dynamic modules (splitted js chunks).
output.clean - To clean the ./dist folder before a new Webpack Process begins.
!important: Note that for the key chunkFilename we have assigned this value:
clientlib-dynamic-modules/resources/[name]-[contenthash].js
Where:
clientlib-dynamic-modules: Will be the folder inside of ./dist where all the chunks will be placed once the compiler finds the require.context() method.
[name]-[contenthash].js: Is the expression to generate the names of the bundles where the [name] is the actual file name and [contenthash] is a hash that represents the actual file content.
Now the new entry point for the loader will be main.ts:
Let's analyse what is actually happening here:
At the beginning of this file we are declaring some interfaces so TypeScript will know how Webpack RequireContext works.
Line:23 Following Core Components guidelines we are declaring a component selector we will use to locate all the components in a page and its JS handler - For example:
<div class="hello-world-css" data-cmp-is="HelloWorld">
Line:25 We call the require.context() - Once the compiler finds this method that will look recursively into ./components folder it will generate one chunk per file and dependencies.
Line:27 We declare a componentsInstances array to store all the instantiated classes so we can access to their location in memory.
Line:29 We define an importer function that takes a component DOM reference as an argument and it will look for its [data-cmp-is] value to know what TS Handler (filename) should use from the map list returned by the require.context() call.
Line:56 We declare a simple component importer function that looks for all the [data-cmp-is] occurrences in the current page and uses the dynamicModulesImporter() to import the bundle associated to that component.
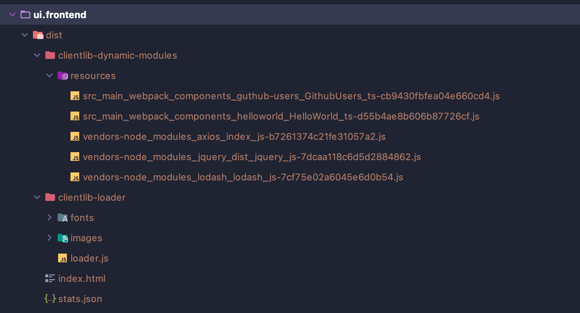
Having configured Webpack to detect the modules we want to split [require.context()] and configured the compiler to place those chunks in the proper folder, now this is how our compiled output result should look in a dev/local environment:

From that dynamic-modules list we can infer that there are two modules GithubUsers.ts and HelloWorld.ts and three vendors axios, jquery and lodash.
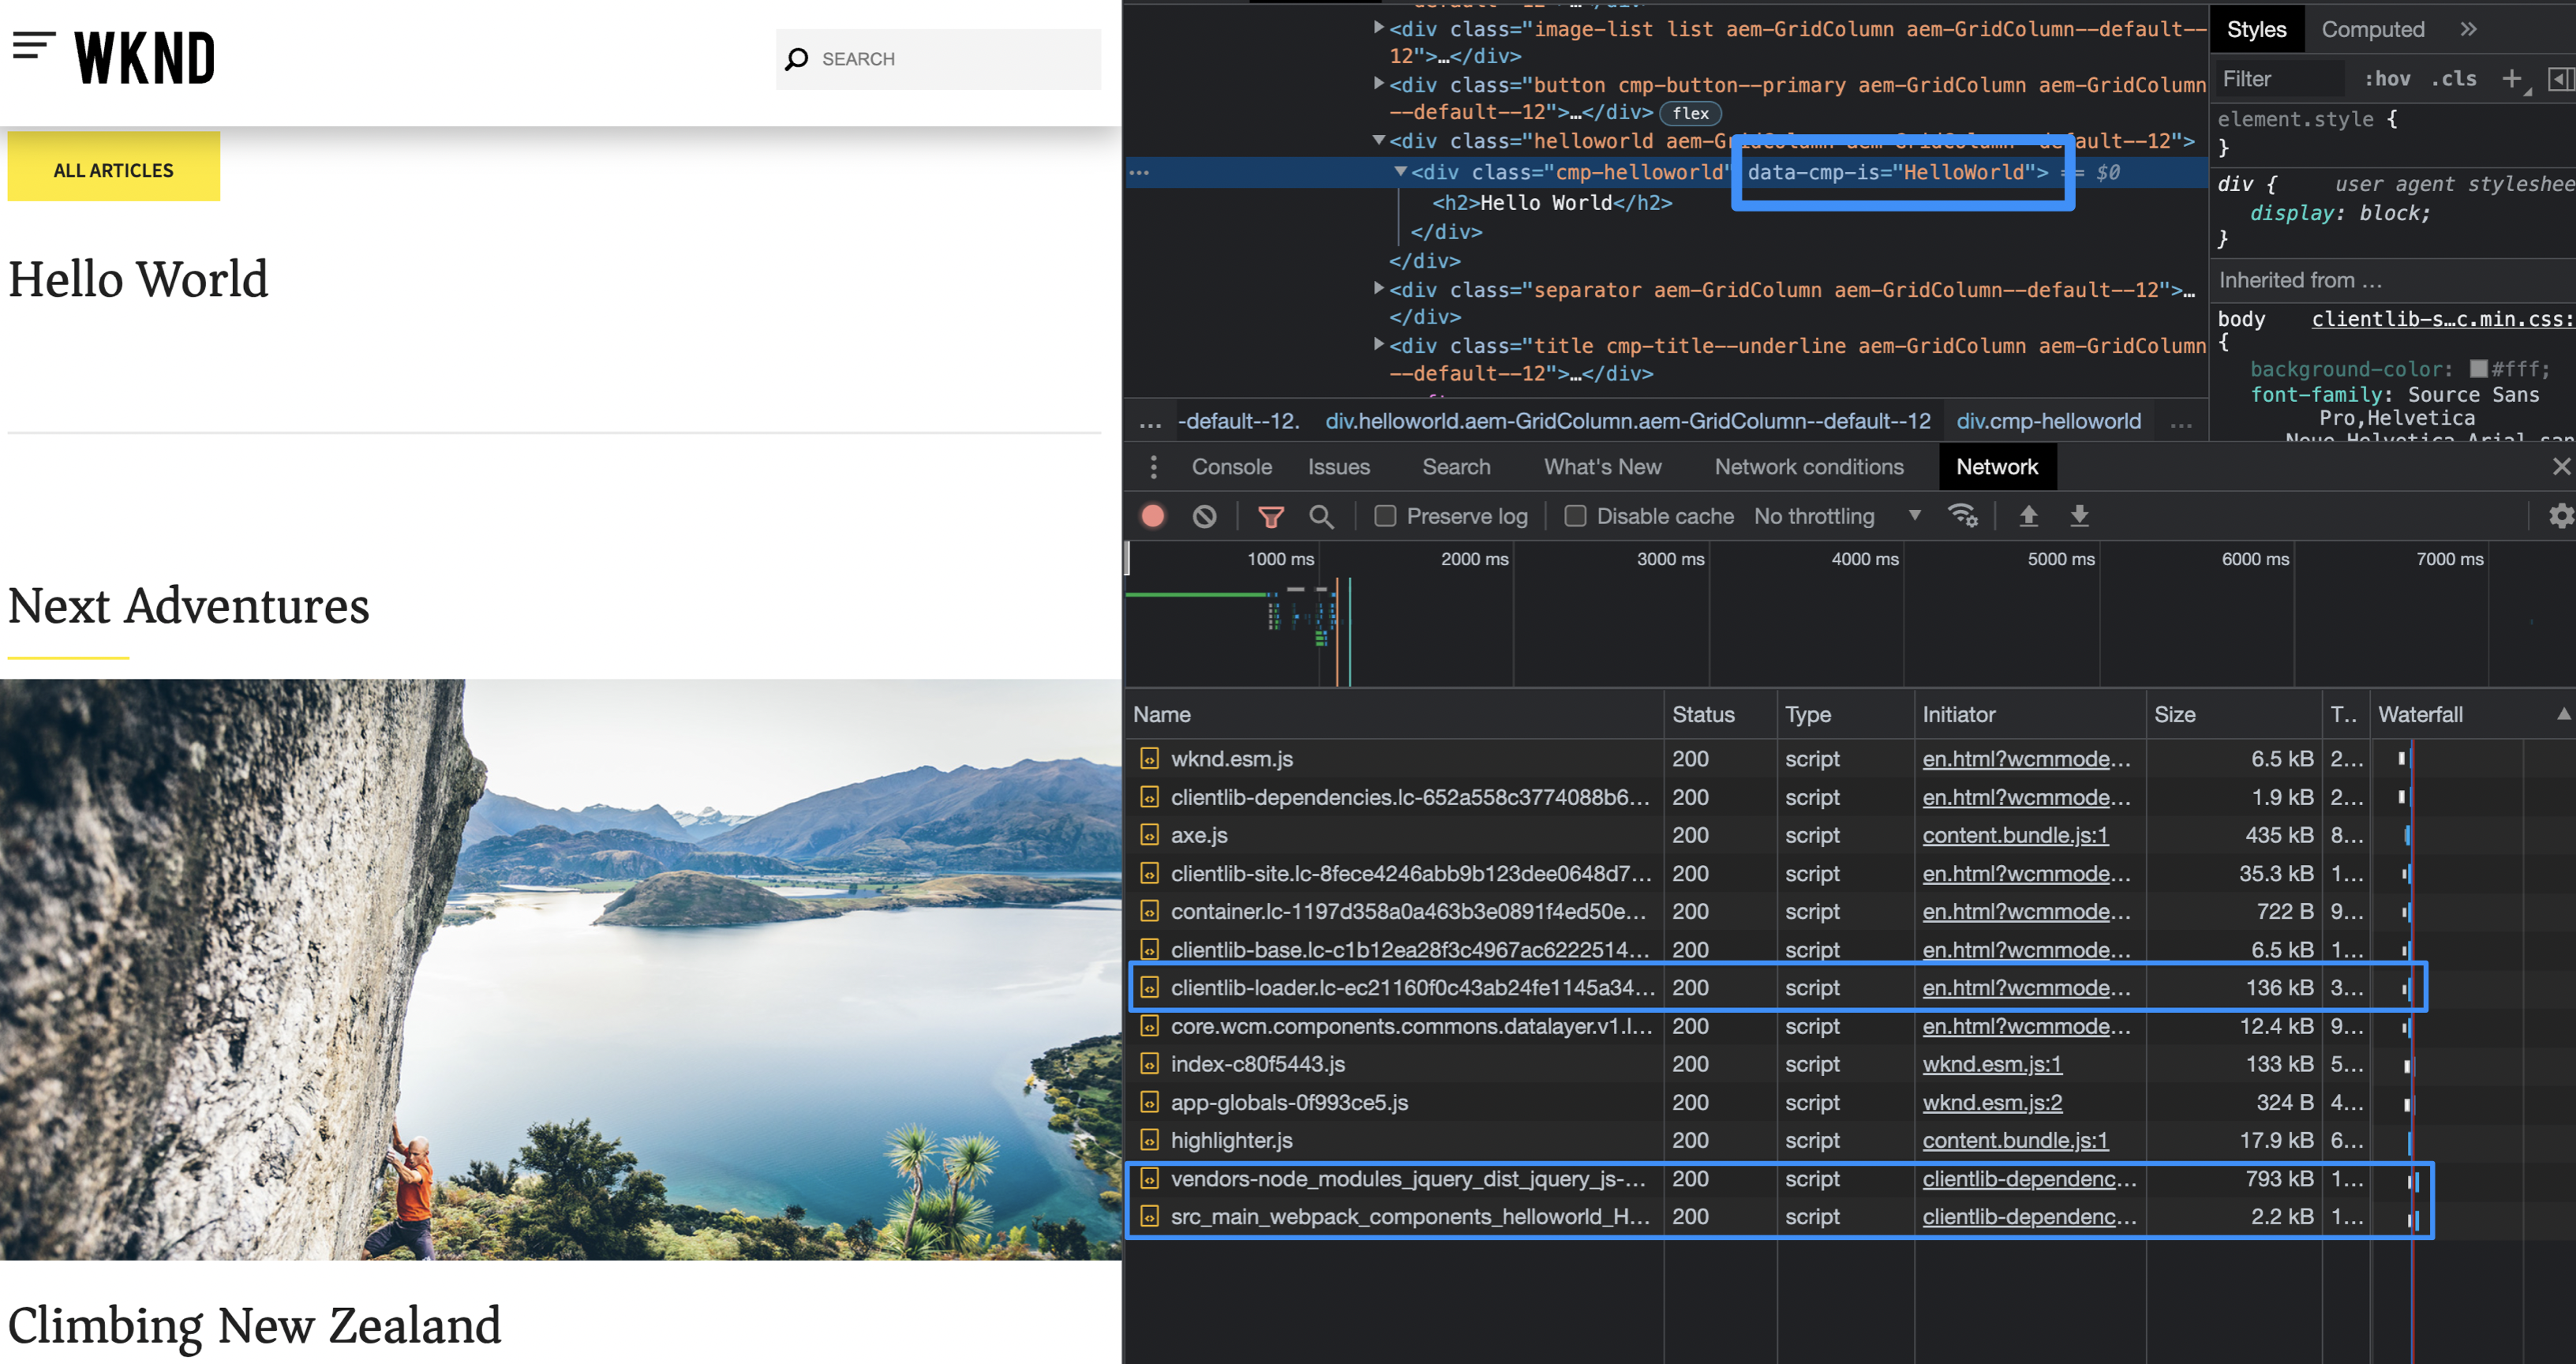
Now let's see how a load process would be for one of those modules, for example: HelloWorld.ts
Since the HelloWorld component is the only dynamic component in our example page the loader will be requesting only the files needed by that component.

From this image we can see the how clientlib-loader is loaded first and then the loader will separately call the files to make the HelloWorld Component work, first the vendors/dependencies and then the module itself.
You can read more about optimization in another article we published: AEM Page Speed Optimization.
Do you want to know more about this subject or is there another AEM use case you have a question about? Contact us any time and we'll be happy to help!
Lucio Poveda Bertos
Lucio Poveda is a Senior Front-End Developer at 3|SHARE who is passionate about what he does. Work-life balance is one of the things he appreciates most about working for the company. He considers himself a passionate chef who also codes and at 3|SHARE he can do both. Besides, that, Lucio is a super fan of the Los Pumas Rugby team and Formula 1.

