
Adam Berberich, November 3, 2016
Creating Custom Project Templates
Now I know it seems like forever ago, but try to think back to the release of Adobe Experence Manager 6.0. Think about all the new features, the Touch UI authoring environment, the new sightly templating language, the deprecated API calls for administrative resource resolvers (ahhh!). AEM 6.0 was one of the biggest overhauls the product has experienced since the highly praised CQ 5.5 release. However, there still seems to be one tab on that main screen that still isn’t used, the “Projects” tab. This tab often ignored by BA’s due to its perceived limited flexibility and predefined project templates. In Part 1 of Making the Most of the “AEM Projects Tab I will walk you through creating your own custom project templates.
To get things started browse over to the projects tab in your active AEM instance. Breeze past the preinstalled example projects and click the “Create” button in the top bar. You should be presented with a batch of preinstalled projects that are non-specific to your current needs, it should look something like the image below.
Once we are finished here today these will be gone and we will have replaced it with your own
custom projects. 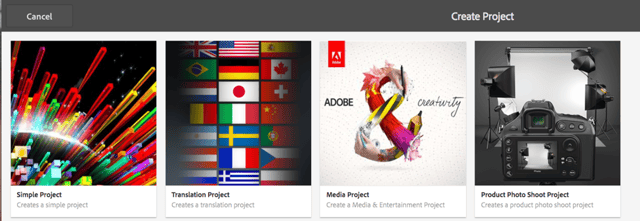
Overriding the create tab
First let’s start with overriding the create tab so we can remove those unsightly generic projects and get your custom project loaded in. This is done overriding the content at the following path: content/jcr_root/content/projects/.content.xml 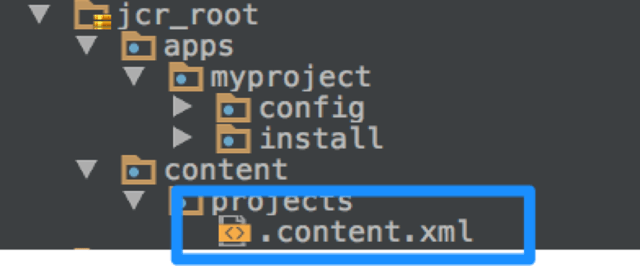
The inside of the content.xml file is where we have the good stuff. Here is what it should contain:
<?xml version="1.0" encoding="UTF-8"?>
<jcr:root xmlns:cq="http://www.day.com/jcr/cq/1.0" xmlns:jcr="http://www.jcp.org/jcr/1.0" xmlns:nt="http://www.jcp.org/jcr/nt/1.0" xmlns:rep="internal" xmlns:sling="http://sling.apache.org/jcr/sling/1.0"
	jcr:mixinTypes="[rep:AccessControllable]"
	jcr:primaryType="sling:OrderedFolder"
	sling:resourceType="cq/projects">
	<jcr:content
		jcr:primaryType="nt:unstructured"
		cq:allowedTemplates="[/apps/myproject/templates/customProjects(/.*)?]"/>
	<rep:policy/>
</jcr:root>
The important part here is the “cq:allowedTemplate”. What we have written here is telling the project wizard to look in the customProjects folder under “/apps/myproject/templates/customProjects” and use any project templates that are stored under there.
Creating the custom project template
Now that you’ve removed the previous out of the box templates you will now your “customProjects” folder with a brand new project template. Start off by building out the following structure within your apps folder.
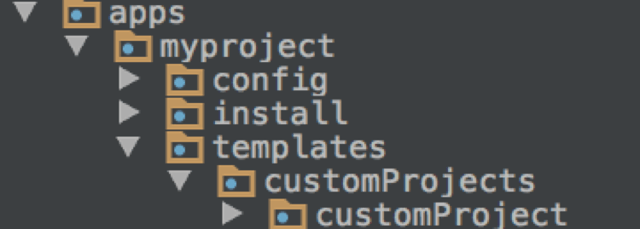
Once you’ve built out the structure it’s time to populate the “customProject” folder. This is the folder that will hold all necessary information about your custom project. My folder features two files currently,
thumbnail.png - A thumbnail to be displayed when selecting the project from the list.
.content.xml - An XML file which contains all necessary code to properly spawn the project.
Since the thumbnail file is pretty self-explanatory go ahead and start with the “.content.xml” file. Here is how mine currently looks:
<?xml version="1.0" encoding="UTF-8"?>
<jcr:root xmlns:sling="http://sling.apache.org/jcr/sling/1.0" xmlns:cq="http://www.day.com/jcr/cq/1.0" xmlns:jcr="http://www.jcp.org/jcr/1.0" xmlns:nt="http://www.jcp.org/jcr/nt/1.0"
	jcr:description="Custom project for 3Share"
	jcr:primaryType="cq:Template"
	jcr:title="Custom Project "
	ranking="{Long}2"
	wizard="/apps/cq/core/content/projects/wizard/steps/customProject.html">

	<jcr:content jcr:primaryType="nt:unstructured"/>

	<gadgets jcr:primaryType="nt:unstructured">
		<team
			jcr:primaryType="nt:unstructured"
			jcr:title="Launches"
			sling:resourceType="cq/gui/components/projects/admin/pod/teampod"/>
		<asset
			jcr:primaryType="nt:unstructured"
			jcr:title="Assets"
			sling:resourceType="cq/gui/components/projects/admin/pod/assetpod"
			cardWeight="90"/>
		<work
			jcr:primaryType="nt:unstructured"
			jcr:title="Workflows"
			sling:resourceType="cq/gui/components/projects/admin/pod/workpod"/>
	</gadgets>

	<roles jcr:primaryType="nt:unstructured">
		<projectUser
			jcr:primaryType="nt:unstructured"
			jcr:title="Custom Project User"
			defaultMembers="[]"
			roleclass="editor"
			roleid="cpu"/>
		<projectowner
			jcr:primaryType="nt:unstructured"
			jcr:title="Custom Project Owner"
			defaultMembers="[]"
			roleclass="owner"
			roleid="cpo"/>
	</roles>

	<workflows
			jcr:primaryType="nt:unstructured"
			tags="[]">
		<models jcr:primaryType="nt:unstructured">
			<customWorkflow
				jcr:primaryType="nt:unstructured"
				modelId="/etc/workflow/models/customProject/jcr:content/model"
				wizard="/apps/cq/core/content/projects/workflowwizards/photoshoot.html"/>
		</models>
	</workflows>
</jcr:root>
There is a lot to go over here so I will break it down one by one. Below the root XML element we have the following properties available to be configured: 
jcr:description - This is the subtext that will be shown on the custom project in the selection screen.
jcr:title - The title of our custom project which will show above the description which you configured earlier.
ranking - Ranking controls what position the project appears in, does it appear before or after other custom projects etc.
wizard - This is a file path to the wizard which will help you spawn this custom project.
Okay, so far so good, let’s proceed to the next section, gadgets. Gadgets are unique to AEM projects, if you open one of the prebuilt projects up you can see them there. Think of them as little dashboard style widgets which can give the client an overview of their project and what is currently happening. The gadgets I have listed there are the three default ones that are included out of the box. You can find all the out of the box gadgets at the following file path: “cq/gui/components/projects/admin/pod/“. I believe that too much information can be a bad thing
so play around with them, see what gadgets your client truly needs and then trim the fat. 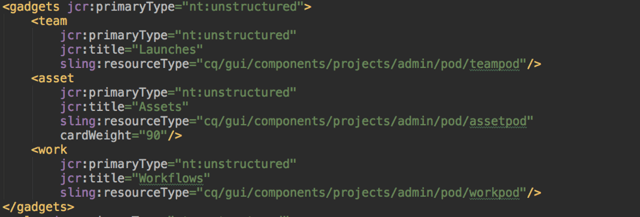
Next we have the “roles” section of the XML file. One of the most powerful features of AEM Projects is being able to create custom roles with custom privileges associated just with that particular project. Roles are assigned on project creation by the projector creator. Each roles element can be populated with the following properties in our XML.
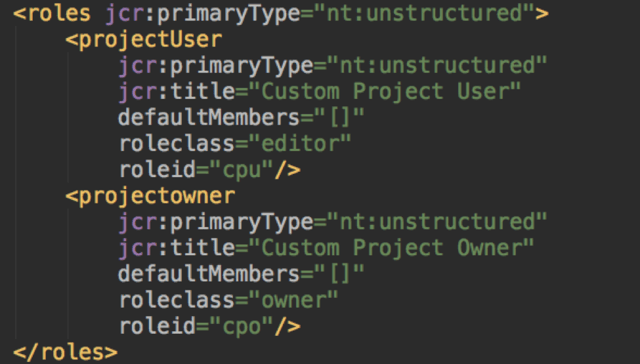 jcr:title - Title of the role, this title is displayed to the end user.
defaultMembers - A list of any default users that should be automatically associated with the role.
roleClass - What rights the user has to the project. Possible choices include “editor”/“owner”
roleId - This is how the role will be saved in the ACL panel of AEM. Essentially this represents what the user group will be named. This section allows us to predefine a group with certain privileges and then use it as the role ID for certain roles within Projects.
Finally, we have the workflows section. This section of the XML allows you to define workflows that will be triggered from within the project. Another powerful feature associated with AEM Projects is the ability to have specific workflow associated with certain projects. They offer the
following properties to be configured.
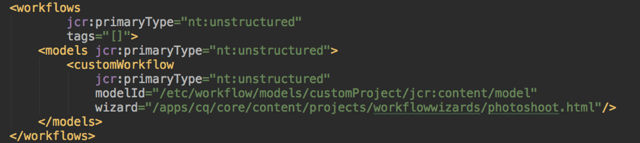 modelId - This is a direct file path to the workflow you’d like to make available.
wizard - A direct path to the dialog associated with that workflow.
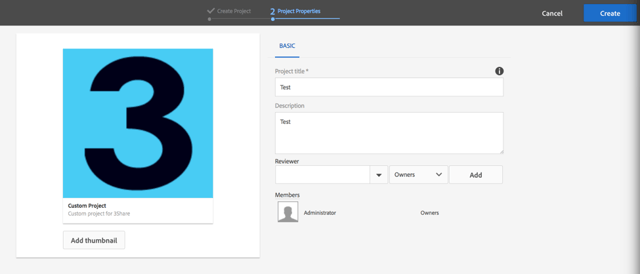
Creating a custom project setup dialog
Okay! Now that we have the custom project showing within the create a project screen all that is left is to create a custom project dialog. If you’ll recall from the section above, we set the custom project’s wizard to the following file path: /apps/cq/core/content/projects/wizard/steps/customProject.html
Browse there and create your own custom project wizard.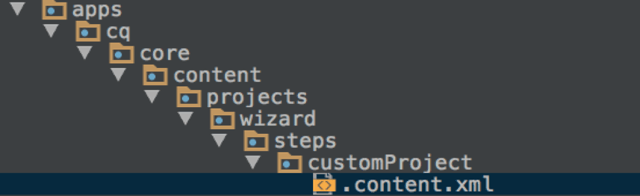 Inside that .content.xml file there is what is essentially a slightly modified Touch UI dialog. Rather than attach it inline here into this blog post, you can download it here, as even at its thinnest it is a 129 line file. Take a moment to go grab that file now and open it in a text editor of your choice. Got it? Good. Now upon first glance you can easily see this is a basic Touch UI dialog with just a few additional buttons loaded in. At the top of the file we see the inclusion of a necessary client lib which helps drive this screen and at the bottom of the file we see in the inclusion of a few buttons which allow the end user to progress to the end of setup. Outside of these small changes everything should work just as it does in your Touch UI dialogs, nice huh?
 Completion
At this point our work is done. You should now be able to advance completely through project creation and make it to your created project dashboard. Congratulations! In my next post in this series we will dive into writing custom workflows associated with projects and the nuances that come into play that aren’t normally a part of workflow development. Until then, happy coding!

Topics: Adobe Experience Manager, Developer Think Tank, Upgrade